
Discover the quiet beauty of snowdrops
Few sights lift the spirits in late winter quite like a drift of snowdrops nodding above cold, dark soil. Modest in scale yet rich in meaning, these delicate flowers are among the first to announce that the turning of the year is upon us.
In churchyards, woodlands, and old gardens across Britain, snowdrops have become synonymous with hope, endurance, and the quiet beauty of the natural world. They serve as a gentle reminder that even in the deepest chill of winter, life is stirring beneath the surface.
Whether you are an avid gardener hoping to cultivate your own collection or a nature lover seeking the perfect winter walk, there is much to learn about these resilient little blooms. From their fascinating botanical history to their vital role in early-year ecosystems, snowdrops offer a rewarding glimpse into the rhythms of nature.
What is a snowdrop?
To truly appreciate the snowdrop, it helps to understand its origins. The botanical name for the genus is Galanthus, which belongs to the Amaryllidaceae family. The name itself is a poetic nod to the plant’s appearance, derived from the Greek words gala (milk) and anthos (flower)—a reference to its pure white blooms.
While the genus comprises around 20 recognised species native to Europe and western Asia, the one most familiar to us in Britain is the common snowdrop (Galanthus nivalis). However, keen-eyed enthusiasts might also spot other species and naturally occurring hybrids, such as Galanthus elwesii (the greater snowdrop) or Galanthus plicatus. These varieties are increasingly finding homes in gardens and specialist collections, prized for their subtle differences in size, leaf width, and flowering time.
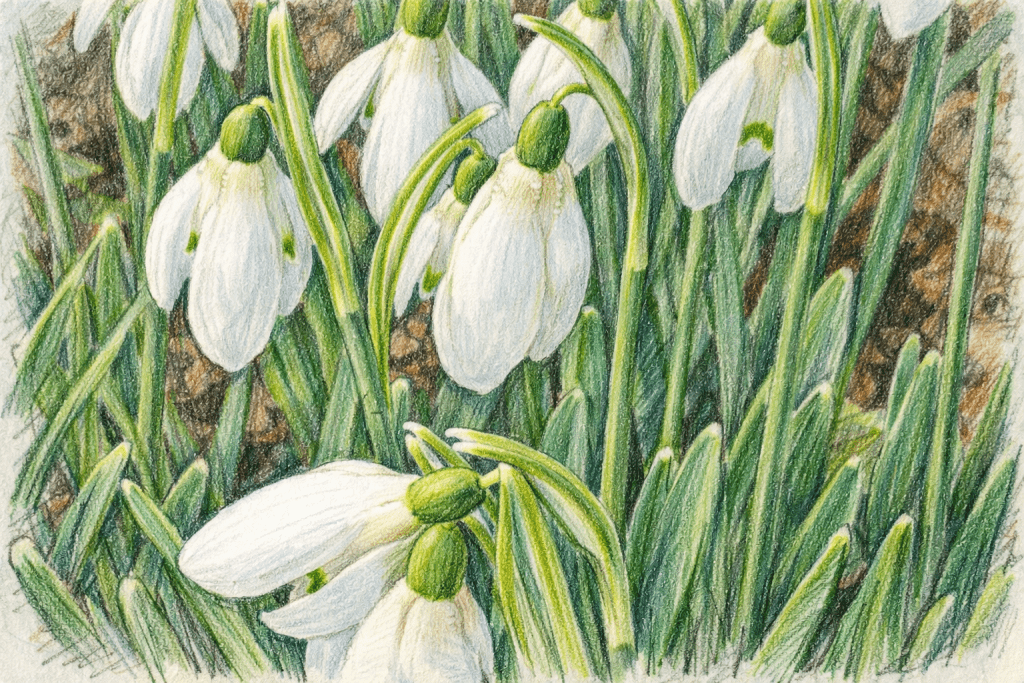
Recognizing the signs
Snowdrops are small, hardy, bulbous perennials that typically flower between January and March, depending on the weather and location. Each plant produces slender, grey-green leaves and a single, nodding flower borne on a thin, elegant stem.
If you look closely at the flower, you will see it consists of six tepals (petal-like structures). There are three longer outer segments that form the familiar droplet shape, protecting three shorter inner segments. These inner segments are often marked with delicate green or yellow patterns. Far from being merely decorative, these markings act as nectar guides, directing early-emerging pollinators to the food source they desperately need.
Despite their fragile appearance, snowdrops are remarkably resilient. They have evolved to survive harsh conditions, containing natural antifreeze proteins that allow them to withstand frost and snow. This unique adaptation enables them to push through frozen ground when little else can grow, offering a welcome splash of brightness in a grey landscape.
Creating a home for snowdrops
If you wish to introduce snowdrops to your own green space, understanding their preferred habitat is key. In the wild, they favour deciduous woodland, riverbanks, and damp meadows, where they benefit from moist soil and dappled light.
To replicate these conditions in a garden, aim for the following:
- Soil: Ensure the ground is moist but well-drained and rich in organic matter.
- Light: Partial shade is ideal, mimicking a woodland floor, though many varieties cope well in full sun during the winter months when tree canopies are bare.
- Position: They look most natural planted under trees, along paths, in borders, or naturalised in grass.
Planting tips
For the best results, snowdrops should be planted ‘in the green’—that is, just after flowering while the leaves are still active. This method tends to yield more reliable results than planting dry bulbs in autumn, as the active roots help the plant re-establish quickly.
Once established, snowdrops are delightfully low maintenance. They require little attention and will gradually multiply, forming generous, sweeping clumps over time that return faithfully year after year.
A history rooted in folklore
The snowdrop has a long and layered history in Britain. Although we often associate them with our ancient landscapes, they were likely introduced from mainland Europe in the late medieval or early modern period. It is thought that monks, valuing the flowers for both their beauty and symbolism, may have been the first to bring them to these shores.
By the eighteenth and nineteenth centuries, snowdrops were being widely planted in churchyards, estates, and cottage gardens. Their appearance near religious sites helped foster strong associations with purity, humility, and the Virgin Mary. Their timing—flowering just as winter begins to recede—inevitably linked them to themes of resurrection and renewal.
The folklore surrounding snowdrops is rich, though sometimes contradictory. In some regions, it was considered unlucky to bring the flowers indoors, particularly before Candlemas (February 2nd). Elsewhere, they were welcomed as protective plants, believed to ward off evil spirits and signal the end of winter’s hardship.
Snowdrops in literature and culture
The quiet charm of snowdrops has inspired artists and writers for centuries. They are rarely loud or showy in verse; instead, they stand as symbols of quiet perseverance, valued not for spectacle but for their timing.
William Wordsworth, a keen observer of seasonal change, captured their gentle resilience perfectly in his poem To a Snowdrop:
“Chaste flower, that art beginning now to peer
From thy green cradle through the encircling snow.”
Later writers echoed this sense of modest courage. In Victorian flower symbolism, the snowdrop represented hope and consolation, making it a popular subject in the sentimental poetry and illustrations of the nineteenth century.
The value of snowdrops today
While we often plant them for their ornamental value, snowdrops play a significant role in the ecosystem.
Ecological benefits
For bees and other insects emerging on mild winter days, snowdrops provide a critical early source of nectar and pollen. Though not native in the strictest sense, they have long been integrated into British ecosystems and are generally considered benign and beneficial to our wildlife.
Medicinal potential
Interestingly, the snowdrop’s value extends beyond the garden gate. Compounds derived from Galanthus species, notably galantamine, have been studied for their potential use in treating neurological conditions. It is important to note, however, that snowdrops should never be used for home remedies. All parts of the plant are toxic if ingested, so please admire them with your eyes only and take care around pets and children.
Conservation and care
As with many seemingly familiar plants, snowdrops benefit from thoughtful management. Many of the spectacular snowdrop displays found in ancient woodlands and historic landscapes owe their existence to centuries of continuity. Protecting these places ensures that future generations can enjoy the same late-winter spectacle.
Gardeners can play a small but meaningful role in caring for this much-loved plant. By sourcing bulbs responsibly from reputable nurseries (avoiding wild-collected specimens), allowing plants to naturalise, and delaying mowing until leaves have died back, you help preserve these flowers for the future.
A flower of quiet reassurance
Snowdrops do not shout for attention. They arrive softly, often unnoticed at first, then steadily claim their place in the landscape. In doing so, they remind us that renewal does not always come with drama; sometimes it begins with a single white flower pushing through the frost.
In gardens large and small, snowdrops remain a timeless symbol of hope, resilience, and the enduring rhythms of the natural world. Why not take a walk this week and see if you can spot the first signs of spring?
Further Reading: RHS Eranthis hyemalis – Winter Aconite, The Corylus – Witch Hazel, How to Protect Your Soil in Winter, A Ruby Gem for Winter: Meeting Cyclamen persicum ‘Verano Red’, Bringing Life to Winter: The Resilience of Eastern Cyclamen
Inspiration: Follow Us on Instagram, Threads, BlueSky, Twitter, TikTok and Pinterest.