There is something deeply satisfying about a garden that wastes nothing.
Vegetable peelings become compost. Fallen leaves enrich the soil. Prunings return nutrients to the borders they once grew in. Nature, after all, has been recycling organic matter for millions of years, creating fertile ecosystems where very little is ever thrown away.
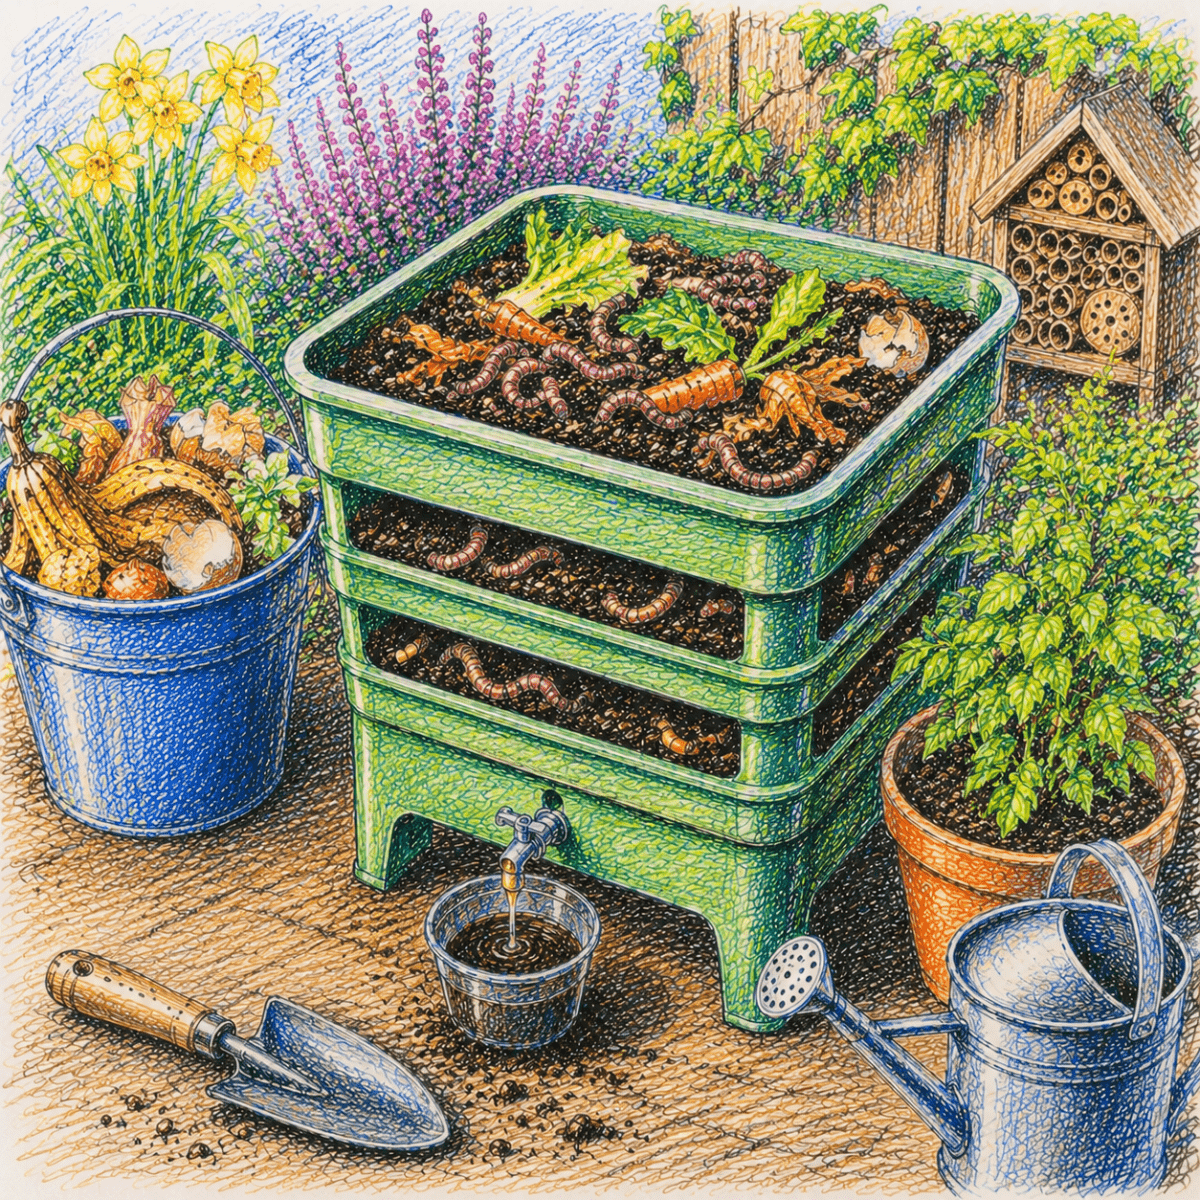
A wormery brings that same principle into our own gardens and homes. Compact, efficient and surprisingly fascinating, it harnesses the natural appetite of composting worms to transform everyday kitchen scraps into nutrient-rich compost and liquid feed. What might otherwise end up in a landfill becomes a valuable resource, helping plants flourish while reducing household waste.
For gardeners seeking a more sustainable way to grow, a wormery offers a simple yet rewarding solution.
What Is a Wormery?
A wormery is a specially designed composting system that uses composting worms, most commonly tiger worms (Eisenia fetida) or red wigglers, to break down organic waste.
Unlike traditional compost heaps, which rely on a combination of microorganisms, air and time, wormeries accelerate the decomposition process through the constant activity of thousands of hungry worms. As they consume fruit and vegetable peelings, coffee grounds, tea leaves and cardboard, they convert these materials into nutrient-dense worm castings and a liquid fertiliser often known as worm tea.
The result is a remarkably efficient composting system that requires very little space, making it ideal for small gardens, patios, courtyards and even balconies.
Far from being unpleasant or unsightly, a well-managed wormery is neat, odour-free and surprisingly easy to maintain.
Nature’s Master Recyclers
Spend a few moments observing earthworms in the garden and it soon becomes clear why they are often called nature’s gardeners.
For centuries, worms have quietly worked beneath our feet, aerating soil, recycling organic matter and helping create the rich, crumbly conditions that plants love. Even Charles Darwin devoted years to studying their remarkable abilities, describing them as one of the most important creatures in the natural world.
A wormery simply brings this hidden process into focus.
Within the trays, worms tirelessly break down waste that would otherwise be discarded. Every banana skin, lettuce leaf and spent tea bag becomes part of a natural cycle, returning nutrients back to the soil rather than being lost.
It’s a small system with a surprisingly large impact.
Why Choose a Wormery?
Reducing Household Waste
Food waste remains one of the largest contributors to household rubbish. A significant proportion of what we throw away is organic material that can be composted rather than sent to landfill.
When food waste decomposes in landfill sites, it often does so without sufficient oxygen, producing methane—a greenhouse gas considerably more potent than carbon dioxide.
By diverting kitchen scraps into a wormery, gardeners can reduce waste while creating something genuinely useful.
It’s a practical step towards a more sustainable lifestyle and one that benefits both the environment and the garden.
Producing Nutrient-Rich Compost
Gardeners often refer to worm compost as “black gold”—and for good reason.
Worm castings contain a wealth of nutrients, beneficial microorganisms and organic matter that help improve soil health. Unlike many fertilisers, they release nutrients gradually, feeding plants over time while improving soil structure.
Mixed into containers, vegetable beds or ornamental borders, worm compost helps create healthier growing conditions, encouraging stronger root systems and more resilient plants.
Creating Liquid Feed Naturally
One of the hidden advantages of a wormery is the nutrient-rich liquid that collects at the base of many systems.
When diluted with water, this liquid can be used as a natural fertiliser for flowers, vegetables and container plants. It’s an excellent way to provide additional nutrients during the growing season without relying on synthetic products.
Perfect for Smaller Gardens
Not every gardener has room for a large compost heap.
A wormery occupies only a small footprint and can be positioned in a sheltered corner of the garden, on a patio or beside a shed. This makes it particularly appealing for urban gardeners who want to compost but have limited space.
Setting Up a Wormery
Getting started is remarkably straightforward.
Choose a wormery that suits the amount of waste your household produces. Multi-tier systems are particularly popular because they allow worms to move naturally through the trays as they process organic matter.
Begin by creating comfortable bedding using damp shredded newspaper, cardboard or coir. This provides a welcoming environment where the worms can settle and begin their work.
Once introduced, the worms need only a modest amount of food while they establish themselves. Gradually increasing the quantity of kitchen scraps allows the colony to grow and adapt.
Like any thriving ecosystem, balance is key.
Feeding Your Worms
Composting worms are not particularly fussy, but they do have preferences.
Fruit and vegetable peelings, coffee grounds, tea leaves, crushed eggshells and small amounts of cardboard all make excellent additions. These materials break down readily and provide the worms with a varied diet.
Certain items are best avoided. Meat, dairy products and oily foods can attract unwanted pests, while excessive amounts of citrus may create conditions that are too acidic.
A good rule is to think of your wormery as an extension of the garden ecosystem—feed it natural, plant-based materials and it will reward you generously.
Keeping Your Wormery Healthy
Successful wormeries require surprisingly little attention.
The contents should feel similar to a wrung-out sponge—moist but not waterlogged. If conditions become too wet, adding shredded cardboard or newspaper helps absorb excess moisture. If the bedding appears dry, a light sprinkle of water is usually sufficient.
A healthy wormery should have an earthy smell reminiscent of woodland soil. Any unpleasant odours often indicate overfeeding or poor airflow, both of which are easily corrected.
Regular observation soon becomes part of the pleasure. Over time, you’ll learn to recognise the signs of a thriving worm population and develop a deeper understanding of the composting process.
Harvesting the Rewards
After several months, the worms will have transformed much of the original material into dark, crumbly compost.
This can be incorporated into borders, mixed into potting compost or used to enrich vegetable beds. The liquid feed collected from the system can also be diluted and applied to plants throughout the growing season.
Many gardeners notice healthier growth, improved soil texture and stronger flowering after incorporating worm compost into their gardening routine.
The transformation feels almost magical—but it’s simply nature doing what it does best.
More Than Composting
Perhaps the greatest appeal of a wormery lies not only in the compost it produces but in what it teaches us.
It reveals the hidden connections between kitchen, garden and wildlife. It reminds us that waste can become a resource and that even the smallest creatures play an essential role in maintaining healthy ecosystems.
For children, it offers a fascinating introduction to decomposition and soil health. For adults, it provides a practical way to garden more sustainably while producing valuable compost.
Most of all, it encourages us to work alongside nature rather than against it.
A Small Change with Lasting Benefits
A wormery may seem like a modest addition to the garden, yet its impact can be remarkable.
Every handful of compost represents food waste diverted from landfill. Every thriving plant reflects nutrients returned to the soil. And every worm quietly contributes to a cycle that has sustained natural landscapes for centuries.
Whether you have a large garden, a small courtyard or simply a desire to live more sustainably, a wormery offers an elegant way to turn everyday waste into something valuable.
In doing so, it transforms not only your composting habits, but your understanding of the remarkable natural processes unfolding beneath the surface of the soil.
Further Reading: How to Make Your Own Liquid Fertiliser from Comfrey, How to Start Composting at Home, How to Discover Your Soil Type (And Why It Matters)
Inspiration: Follow Us on Instagram, Threads, BlueSky, Twitter, TikTok and Pinterest.