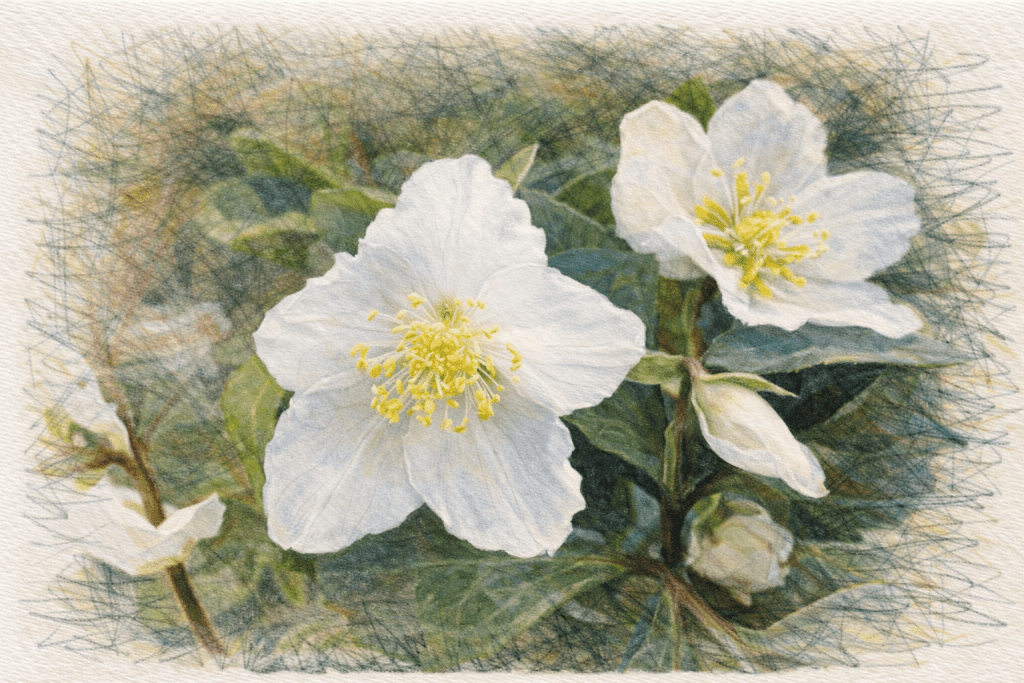
When the frost settles and the days grow short, most gardens retreat into a slumber of browns and greys. It is easy to assume that colour and life are reserved for the warmth of spring and summer. Yet, there is a quiet hero ready to defy the cold. Helleborus niger, commonly known as the Christmas Rose, is the star your winter garden has been waiting for.
Helleborus niger: The Star Plant That Brightens the Winter Garden
While other plants wither in the chill, this evergreen perennial pushes through the frozen earth to reveal pristine white blooms. It offers a fresh, hopeful sight in the depths of winter, reminding us that nature never truly stops. If you are looking to add brightness to shady corners or create a focal point that sparkles against the snow, it is time to rediscover this classic winter beauty.
A flower of contradictions: History and origins
The Helleborus niger is a plant of fascinating contrasts. Its botanical name tells a story hidden beneath the soil. While its flowers are a brilliant, snowy white, the specific epithet niger means ‘black’, referring to the colour of its thick, dark roots.
Native to the mountainous regions of Central and Southern Europe—specifically the Alps, Carpathians, and Appennines—this plant is built for resilience. It thrives in alpine environments, which explains its remarkable ability to withstand freezing temperatures.
Historically, the name Helleborus derives from the Greek words elein (to injure) and bora (food). This is a stark warning from the ancients: despite its delicate beauty, the plant is toxic if ingested. For centuries, it has walked a fine line between a revered ornamental flower and a dangerous substance, captivating gardeners and herbalists alike.
Finding the perfect spot in your garden
To get the best out of your Christmas Rose, you must treat it to conditions that mimic its natural alpine home. Unlike some hardy perennials that can be scattered anywhere, Helleborus niger has specific preferences.
Ideally suited for shade
These plants flourish in partial shade. In the wild, you would find them nestled at the edge of woodlands or beneath the canopy of deciduous trees. They appreciate the dappled sunlight of winter when the trees are bare, but require protection from the harsh, direct sun of summer. A spot that is too dark will result in lush foliage but very few flowers, so aim for a balance.
Soil requirements
The Christmas Rose craves rich, well-drained soil. It struggles in heavy clay that sits wet in winter or sandy soil that dries out too quickly in summer. To keep it happy, incorporate plenty of organic matter—such as leaf mould or garden compost—before planting. They also have a preference for alkaline conditions, so if your soil is acidic, adding a little garden lime can work wonders.
A note on stability
Once you have chosen a spot, try to keep it there. Helleborus niger possesses a deep and extensive root system and resents being disturbed. Establish it well, and it will reward you with blooms for years to come.
Creating a winter tapestry: Companion plants
A single Hellebore is beautiful, but a drift of them amongst other winter gems is breathtaking. Pairing Helleborus niger with the right companions creates a layered, textural display that makes a winter garden feel complete.
Consider planting them alongside Snowdrops (Galanthus). The nodding white heads of snowdrops echo the purity of the Christmas Rose, creating a carpet of white that looks magical under low winter light.
Cyclamen coum is another excellent partner. With their swept-back pink or magenta petals and silver-patterned leaves, they provide a splash of vibrancy that contrasts beautifully with the Hellebore’s white petals.
For texture, look to Ferns. The evergreen fronds of the Hart’s Tongue Fern (Asplenium scolopendrium) provide a glossy, architectural backdrop that highlights the delicate structure of the Hellebore flowers.
Features that captivate
What makes Helleborus niger such a standout? It is the sheer elegance of the bloom.
The flowers are saucer-shaped, usually 4–8cm across, held on short, sturdy stems that rise just above the foliage. Unlike many other flowers, what appear to be petals are actually sepals. This biological quirk means the ‘petals’ do not fall off quickly; they remain on the plant for months, slowly fading from pure white to a soft, antique pink or even green as the seeds develop.
At the centre of each flower lies a crown of golden-yellow stamens, acting as a beacon for any pollinators brave enough to venture out in January or February.
The foliage is equally attractive. The leaves are leathery, dark green, and divided into leaflets like the fingers of a hand (pedate). Being evergreen, they provide ground cover and structure all year round, acting as a foil for summer-flowering plants before taking centre stage again when the frost returns.
Legends, myths, and old wives’ tales
Few plants are as steeped in folklore as the Christmas Rose. Its blooming time, coinciding with the festive season, has birthed many legends.
The Legend of Madelon
The most famous tale explains its common name. Legend has it that a young shepherdess named Madelon was tending her flock on a cold winter night when the Wise Men passed by with gifts for the newborn Jesus. Madelon wept because she had no gift to offer, and the ground was frozen, yielding no flowers. An angel, seeing her tears, brushed the snow aside and revealed the white Hellebore blooming beneath. Madelon gathered the flowers and offered them as a gift of love—the first Christmas Rose.
Warding off evil
In the Middle Ages, the plant was viewed with a mix of fear and reverence. It was widely believed to possess magical properties. People would plant Helleborus niger near their front doors, not just for decoration, but to prevent evil spirits and witches from entering the home. In some traditions, the powdered roots were sprinkled on the floor to make inhabitants invisible—though given the plant’s toxicity, this was likely a dangerous practice!
Weather forecasting
An old wives’ tale suggests the plant could predict the weather for the coming year. Country folk would cut twelve Hellebore flowers on Christmas Eve, placing them in water. Each flower represented a month of the coming year. If a flower opened fully and stayed fresh, the corresponding month would be fair; if it wilted, the month would be wet and stormy.
Benefits and uses beyond beauty
While we primarily value Helleborus niger for its ornamental value today, it has a long history of utility, albeit a risky one.
A warning on toxicity
It is crucial to remember that all parts of the plant are poisonous. In ancient herbal medicine, it was used as a powerful purgative and to treat worms, but the difference between a cure and a poison was often a matter of a few grains. Today, we leave the medicinal uses firmly in the history books. Always wear gloves when handling the plant, as the sap can sometimes irritate the skin.
A lifeline for pollinators
The true modern benefit of the Christmas Rose is ecological. In the depths of winter, food sources for insects are scarce. On mild January or February days, honeybees and bumblebees will emerge to forage. The open, accessible flowers of Helleborus niger, rich in pollen and nectar, provide a vital lifeline for these early flyers, helping to sustain local pollinator populations until spring properly arrives.
Bring the magic of winter home
There is something deeply satisfying about looking out of your window on a grey day and seeing a cluster of bright white flowers defying the elements. Helleborus niger is more than just a plant; it is a symbol of endurance and hope.
Whether you have a sprawling woodland garden or a shady courtyard container, there is space for a Christmas Rose. Why not visit your local nursery this weekend? Discover the varieties available and bring a little winter magic home.
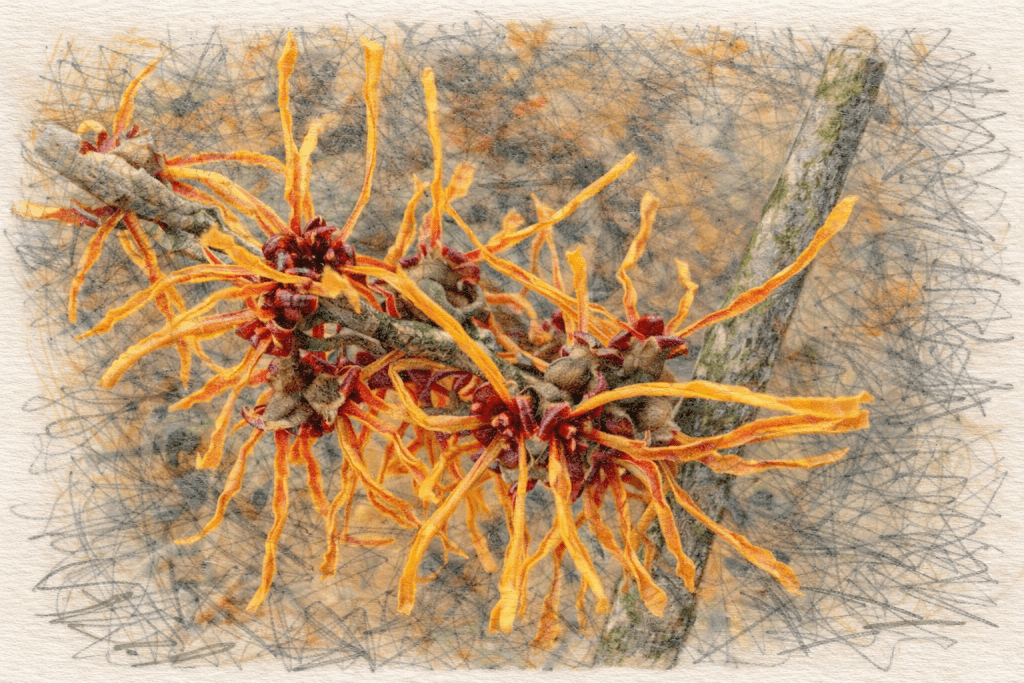
Gardens in winter are often dismissed as dormant, grey spaces waiting for the first breath of spring. We tend to retreat indoors, ignoring the potential beauty that cold months can offer. But nature has a way of surprising us, and few plants deliver that surprise quite like the Witch Hazel. Specifically, the Hamamelis x intermedia ‘Jelena’.
This isn’t just a shrub; it is a fiery beacon in the bleakest months of the year. When frost covers the ground and other plants have withered back, ‘Jelena’ bursts into life with copper-orange blooms that defy the chill. If you want to transform your outdoor space from a winter wasteland into a vibrant landscape, this is the plant to know.
A Meeting of East and West: The Origins of ‘Jelena’
To understand ‘Jelena’, we first need to look at its family tree. The plant is a hybrid, known botanically as Hamamelis x intermedia. This “intermedia” part of the name refers to it being a cross between two Asian species: the Japanese witch hazel (Hamamelis japonica) and the Chinese witch hazel (Hamamelis mollis).
The specific cultivar ‘Jelena’ has a rather romantic history. It was raised at the famous Kalmthout Arboretum in Belgium by Robert and Jelena de Belder. The de Belders were renowned horticulturists who significantly influenced the world of garden design and plant breeding in the 20th century. Robert named this specific seedling after his wife, Jelena, in 1954. It was a fitting tribute—a beautiful, resilient, and unique plant named for a woman who dedicated her life to botany.
Since its introduction, ‘Jelena’ has gained the prestigious Award of Garden Merit (AGM) from the Royal Horticultural Society, cementing its status as a reliable and superior plant for British gardens.
Why You Need ‘Jelena’ in Your Garden
There are many winter-flowering shrubs, but few command attention like this one. Here is why you should consider digging a hole for it this season.
Unrivalled Winter Colour
The primary reason gardeners fall in love with ‘Jelena’ is the flowers. Appearing from late December through to February (depending on the weather), the petals are like crimped ribbons. They start red at the base, transition to orange in the middle, and finish with yellow tips. From a distance, this blends into a rich, glowing copper that warms up even the coldest January day.
Witch Hazel ‘Jelena’
Incredible Fragrance
Winter gardens can lack scent, but ‘Jelena’ solves this. On a still, sunny winter day, the flowers release a delicate, spicy fragrance. It isn’t overpowering, but rather a subtle perfume that invites you to lean in closer.
Autumn Interest
This plant isn’t a one-trick pony. While it is famous for winter blooms, the foliage in autumn is equally spectacular. The broad, oval green leaves turn magnificent shades of orange, red, and scarlet before falling to reveal the flower buds ready for winter. It works hard for its place in your border for most of the year.
Finding the Perfect Spot: Growing Conditions
Witch Hazels have a reputation for being slightly fussy, but if you get the conditions right, they are generally trouble-free. Here is what ‘Jelena’ loves.
Sun and Shelter
Ideally, plant your Witch Hazel in an open, sunny position or dappled shade. Sun is vital for ripening the wood, which ensures better flowering the following winter. However, try to avoid an exposed, windy site. The flowers are hardy, but strong winds can strip them away prematurely. An open woodland setting is often perfect.
Soil Requirements
‘Jelena’, like most witch hazels, thrives in neutral to acid soil. It prefers a pH of 6.5 or lower. If you are gardening on chalk, you will likely struggle to keep it happy in the ground. In that case, consider a large container filled with ericaceous compost.
The soil needs to be moisture-retentive but free-draining. These plants hate having “wet feet” in winter, but they also dislike drying out completely in summer. A good mulch of leaf mould or compost in the spring helps retain that essential moisture during dryer months.
Space to Spread
This is a deciduous shrub with a spreading habit. Over 10 to 20 years, it can reach a height and spread of 4 metres by 4 metres. It creates a beautiful, vase-shaped silhouette, so give it room to breathe. Avoid crowding it with aggressive competitors.
Perfect Partners: Designing a Winter Scheme
Because ‘Jelena’ has such a distinct shape—bare branches adorned with spidery flowers—it looks best when underplanted. You want companions that highlight its copper tones without competing for height.
Snowdrops (Galanthus): The pure white of snowdrops provides a crisp contrast to the warm orange of the witch hazel. A carpet of white beneath the copper branches looks stunning in February.
Cyclamen (Cyclamen coum): For a splash of colour at ground level, pink or magenta Cyclamen work beautifully. The rounded leaves of the cyclamen contrast well with the spidery nature of the witch hazel flowers.
Hellebores (Helleborus): The Lenten Rose or Christmas Rose offers architectural foliage and nodding flowers that complement the woodland feel of the witch hazel. Look for white or pale yellow varieties to act as a foil for the copper blooms above.
Dogwood (Cornus): If you have a large space, planting red-stemmed or yellow-stemmed dogwood nearby can create a striking “fire and ice” effect, though ensure the dogwood doesn’t crowd the witch hazel.
Beyond the Garden: Uses and Benefits
While Hamamelis x intermedia ‘Jelena’ is primarily ornamental, the wider Witch Hazel family has a long history of utility.
Medicinal Heritage
The North American native species (Hamamelis virginiana) is the source of the witch hazel found in medicine cabinets worldwide. Native Americans used the bark and leaves to treat skin irritations and swellings. Today, distilled witch hazel is a common ingredient in toners and skincare products due to its astringent properties. While ‘Jelena’ is grown for beauty rather than the apothecary, it shares this rich botanical lineage.
Wildlife Haven
In the depths of winter, food sources for pollinators are scarce. On mild winter days, the flowers of ‘Jelena’ can provide a lifeline for early-emerging insects.
Cut Flowers
Don’t be afraid to snip a few branches. Bringing a flowering branch of ‘Jelena’ indoors is a wonderful way to enjoy the scent. The warmth of the house will help the perfume diffuse, filling a room with a clean, spicy aroma.
Myths and Folklore: The Water Witch
The common name “Witch Hazel” is steeped in folklore, though it has nothing to do with witches in the Halloween sense.
The “Witch” part of the name comes from the Old English word wice, meaning “pliant” or “bendable.” Early settlers in America observed Native Americans using the flexible branches of the native Hamamelis for dowsing—the practice of searching for underground water sources.
Because the leaves of the American Witch Hazel resembled the English Hazel tree (to which it is unrelated), the name stuck. The forked twigs were believed to dip downward when held over water, a practice that many dowsers still swear by today. So, when you look at your ‘Jelena’, you are looking at a plant historically associated with hidden depths and discovery.
Interesting Facts About ‘Jelena’
Weatherproof Mechanisms: The petals of ‘Jelena’ have a clever survival trick. On extremely cold, frosty nights, the petals curl up tightly towards the centre of the flower to protect themselves. As the sun comes out and the temperature rises, they unfurl again. This extends the flowering period significantly compared to other winter blooms.
Slow Burner: Witch hazels are not plants for the impatient. They grow relatively slowly, which makes them ideal for low-maintenance gardens as they rarely need pruning.
The “Spider” Flower: Children are often fascinated by the blooms, referring to them as “spiders” or “confetti” due to their crimped, ribbon-like appearance.
Embrace the Cold Season
It is easy to shut the curtains on the garden when the temperature drops, but plants like Hamamelis x intermedia ‘Jelena’ remind us that nature doesn’t stop. It offers colour, scent, and architectural beauty even in the depths of winter.
Whether you have a sprawling country estate or a modest suburban border, there is space for this copper-coloured gem. It connects us to the season, encourages us to step outside, and bridges the gap between the last leaf of autumn and the first bulb of spring.
So, wrap up warm, grab a spade, and invite ‘Jelena’ into your garden. Your winter view will never be the same again.
Winter gardens need not be bleak landscapes of bare branches and dormant soil. The right selection of winter interest shrubs can transform your outdoor space into a captivating display of colour, texture and fragrance throughout the coldest months. These hardy performers stand as beacons of beauty when most plants retreat into seasonal slumber.
Choosing shrubs for winter interest requires understanding how different species contribute to the garden’s structure and appeal during the darker months. Some offer brilliant stems that glow like fire against frost-covered ground, while others produce berries that feed wildlife and provide splashes of vibrant colour. Many winter-flowering varieties release intoxicating fragrances that drift through crisp air, reminding us that life persists even in the depths of winter.
The art of winter gardening has roots stretching back centuries. Victorian gardeners understood the importance of four-season interest, carefully selecting plants that would provide structure and beauty year-round. They recognised that winter gardens serve not only aesthetic purposes but also practical ones—providing shelter for wildlife, protecting soil from erosion, and creating windbreaks that make outdoor spaces more comfortable.
Modern gardeners continue this tradition, though we now have access to an even wider range of cultivars and species. The key lies in selecting shrubs that complement your garden’s existing structure while providing the specific type of winter interest you most desire. Whether you’re drawn to architectural forms, brilliant colours, or seasonal fragrances, the following ten shrubs will ensure your garden remains a source of joy throughout winter’s reign.
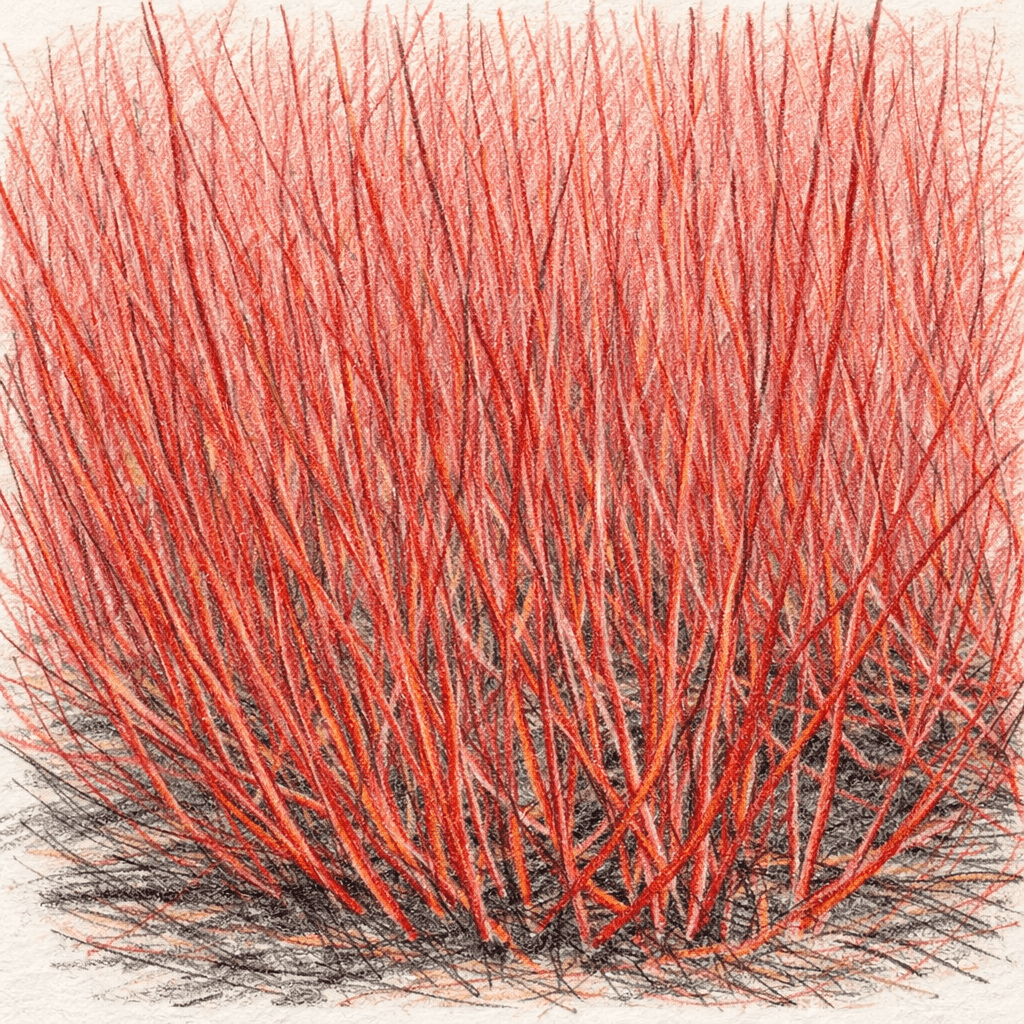
Cornus alba ‘Sibirica’ – Siberian Dogwood
The Siberian Dogwood stands among winter’s most dramatic performers, transforming ordinary garden borders into galleries of living art. This deciduous shrub reveals its true glory only after autumn’s final leaves have fallen, when its brilliant coral-red stems emerge like brushstrokes against winter’s neutral palette.
Native to Siberia and northern China, this hardy shrub has graced British gardens since the 18th century. Victorian plant hunters prized it for its ability to provide colour when little else could survive the harsh conditions. The stems intensify in colour as temperatures drop, reaching their most vibrant hues during the coldest months.
Cornus alba ‘Sibirica’ – Siberian Dogwood. Winter Interest Shrub
Advantages: Exceptionally hardy, tolerating temperatures well below freezing. Provides stunning winter colour without requiring flowers. Easy to maintain through annual pruning. Excellent for cutting and bringing indoors for winter arrangements.
Considerations: Can spread vigorously if not managed properly. Requires annual hard pruning to maintain the brightest stem colour. May look untidy during summer months when foliage takes precedence.
Ideal Situation: Thrives in full sun to partial shade with moist, well-drained soil. Plant in locations where winter sun can illuminate the stems for maximum impact. Excellent near water features where reflections double the visual effect.
Hamamelis x intermedia ‘Jelena’ – Witch Hazel
Witch hazel brings magic to winter gardens through its extraordinary ability to bloom during the coldest months. ‘Jelena’ produces masses of copper-orange flowers that unfurl like tiny fireworks across bare branches, typically from December through February.
This hybrid arose from crosses between Asian and American species, combining the best characteristics of both parents. The genus name derives from the Greek words meaning “together with fruit,” referring to the plant’s unusual habit of producing flowers and fruit simultaneously. Ancient civilisations valued witch hazel for its supposed mystical properties, and early American settlers learned to use it medicinally from Native American tribes.
Hamamelis x intermedia ‘Jelena’ – Witch Hazel. Winter Interest Shrub
Advantages: Spectacular winter flowering when few other plants bloom. Intense fragrance carries on winter air. Beautiful autumn foliage provides dual-season interest. Long-lived and relatively disease-free once established.
Considerations: Slow to establish and reach flowering size. Expensive initial investment compared to other shrubs. Requires patience as young plants may take several years to bloom prolifically.
Ideal Situation: Prefers partial shade with shelter from harsh winds. Thrives in acidic to neutral soil with consistent moisture. Plant near pathways or windows where the fragrance can be appreciated.
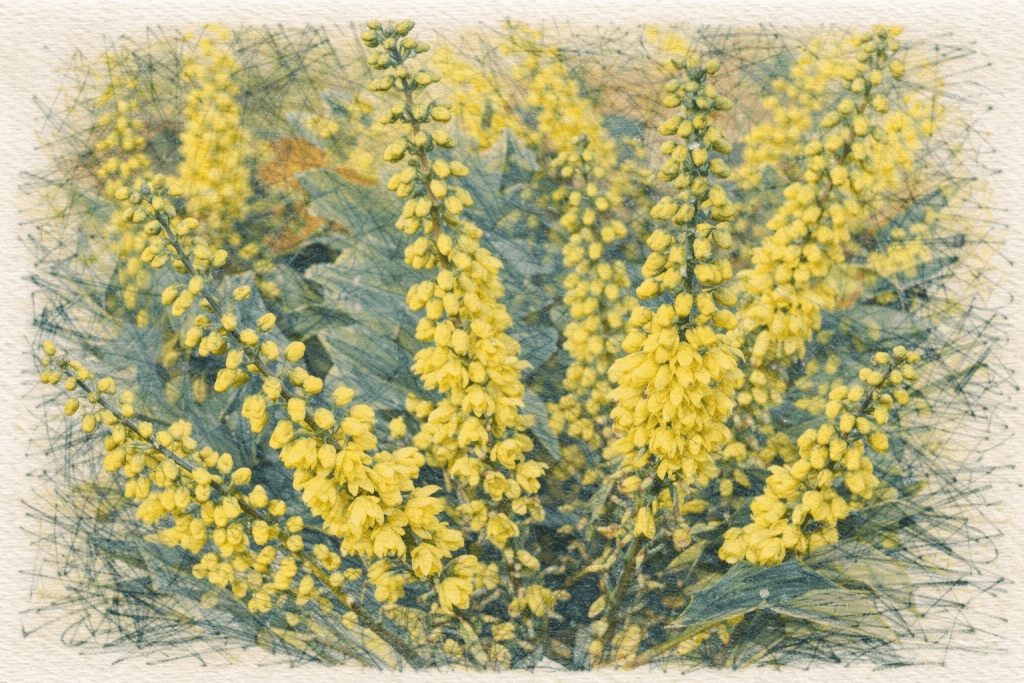
Mahonia x media ‘Charity’ – Oregon Grape
‘Charity’ mahonia commands attention through winter with its architectural presence and honey-scented yellow flowers. This evergreen shrub produces dramatic spikes of bright yellow blooms from November through February, followed by blue-black berries that birds treasure.
The mahonia genus honours Bernard McMahon, an Irish-American botanist who helped introduce Lewis and Clark’s plant discoveries to cultivation. ‘Charity’ represents a hybrid between two species, combining the hardiness of one parent with the floral abundance of the other. Victorian gardeners particularly valued mahonias for their ability to provide structure and colour during winter months.
Mahonia x media ‘Charity’ – Oregon Grape.
Advantages: Evergreen foliage maintains year-round structure. Fragrant flowers attract winter pollinators. Berries provide food for wildlife. Tolerates difficult growing conditions including dry shade.
Considerations: Spiny leaves require careful placement away from pathways. Can become leggy with age if not pruned properly. May suffer wind damage in exposed locations.
Ideal Situation: Excellent for north-facing borders and difficult shady spots. Tolerates most soil types but prefers well-drained conditions. Ideal as a specimen plant or backdrop for smaller winter performers.
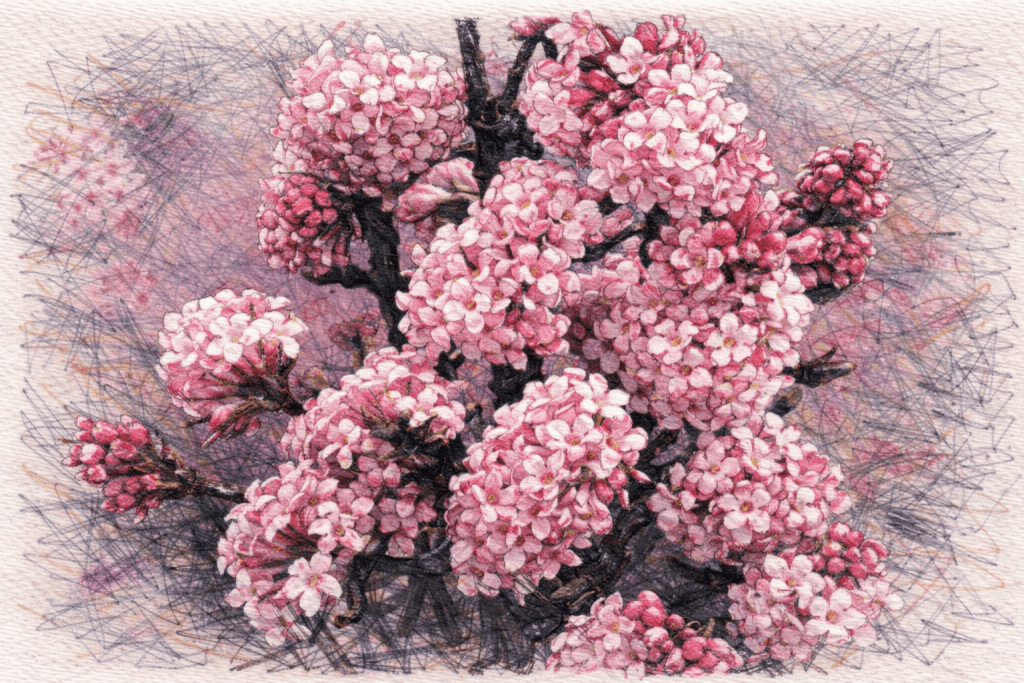
Viburnum x bodnantense ‘Dawn’ – Fragrant Viburnum
‘Dawn’ viburnum epitomises winter romance, producing clusters of intensely fragrant pink flowers that brave the harshest weather. This deciduous shrub begins blooming in November and continues intermittently through March, with the most prolific displays occurring during mild spells.
This hybrid emerged from Bodnant Garden in Wales during the 1930s, where it quickly gained recognition for its exceptional winter performance. The cross between two Asian species created a shrub that combined the best flowering characteristics of both parents. Its common name reflects the plant’s ability to bring the promise of spring even during winter’s darkest days.
Viburnum x bodnantense ‘Dawn’ – Fragrant Viburnum. Winter Interest Shrub
Advantages: Exceptional fragrance carries long distances on winter air. Flowers appear sporadically throughout winter months. Attractive autumn foliage extends seasonal interest. Relatively fast-growing compared to other winter bloomers.
Considerations: Flowers may be damaged by severe frost, though new buds continue opening. Can become quite large if not pruned regularly. May look sparse during summer months.
Ideal Situation: Thrives in full sun to partial shade with fertile, well-drained soil. Plant near seating areas or pathways where fragrance can be fully appreciated. Benefits from shelter from harsh winds.
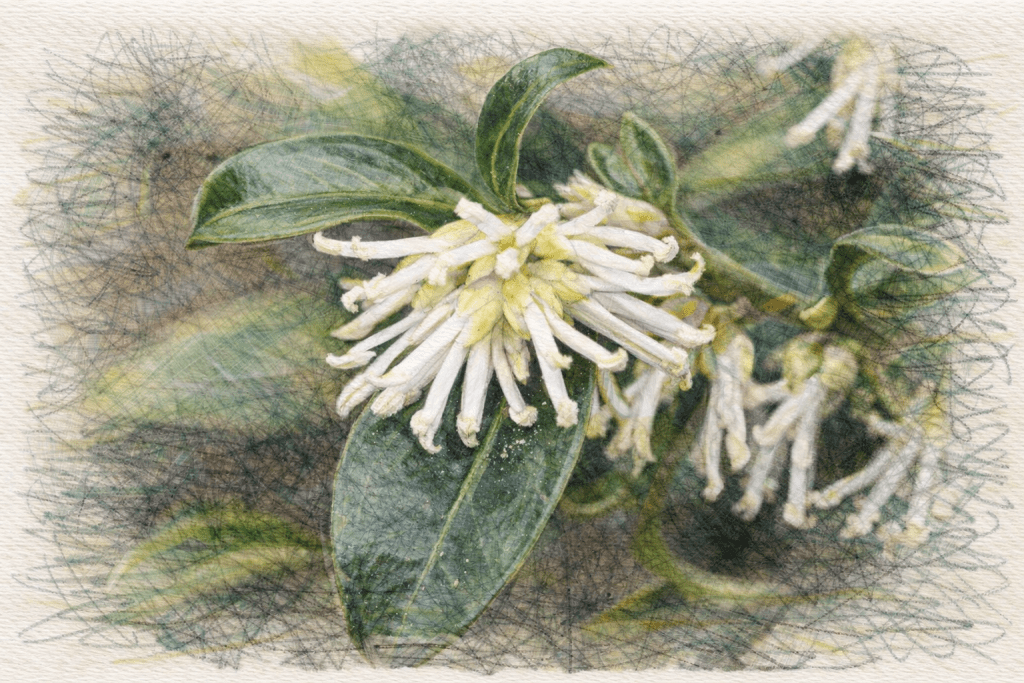
Sarcococca confusa – Sweet Box
Sweet box proves that the most powerful winter performers often come in modest packages. This compact evergreen produces tiny white flowers that release an intensely sweet fragrance capable of perfuming entire garden areas. The blooms appear from December through February, followed by glossy black berries.
Native to western China, sarcococca species have provided winter fragrance in British gardens since the Victorian era. The genus name combines Greek words meaning “fleshy berry,” while the species name “confusa” reflects the botanical confusion that once surrounded this group of closely related plants. Despite its small stature, sweet box has earned a place among the most treasured winter garden plants.
Sarcococca confusa – Sweet Box
Advantages: Intense fragrance from inconspicuous flowers. Excellent ground cover in challenging locations. Tolerates deep shade where few other plants thrive. Requires minimal maintenance once established.
Considerations: Slow to establish and spread. Flowers are not visually striking despite their fragrance. Can be expensive to purchase in sufficient quantities for ground cover use.
Ideal Situation: Perfect for dry shade under trees or shrubs. Thrives in most soil types except waterlogged conditions. Ideal near entrances or pathways where fragrance creates welcoming atmospheres.
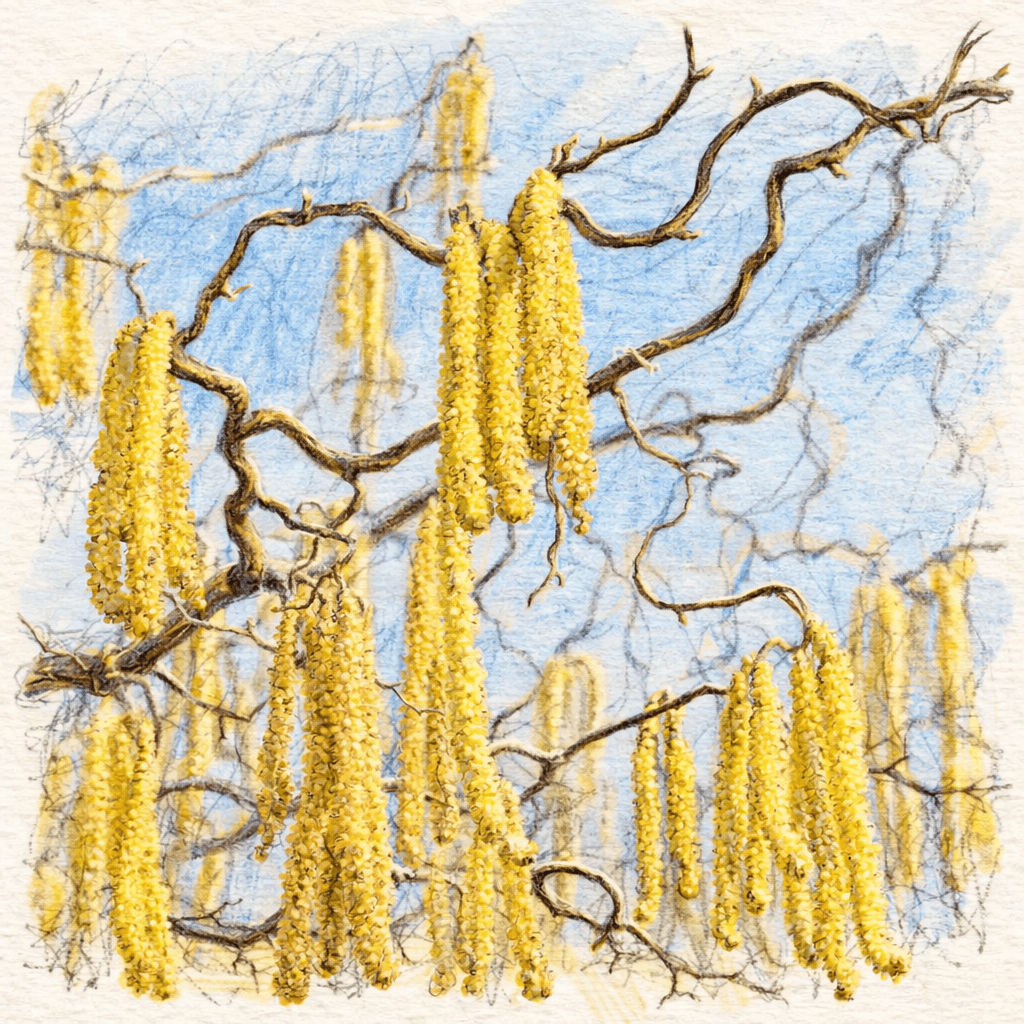
Corylus avellana ‘Contorta’ – Corkscrew Hazel
The corkscrew hazel transforms winter gardens into living sculptures through its extraordinary twisted branches. This deciduous shrub reveals its full architectural drama only after leaves fall, when the contorted stems create intricate patterns against winter skies. Long yellow catkins drape the branches in late winter, adding movement and colour.
This remarkable cultivar arose as a mutation discovered in a Gloucestershire hedgerow during the 1860s. Victorian gardeners immediately recognised its unique appeal, and it quickly became a prized specimen plant in fashionable gardens. The twisted growth habit results from a genetic mutation that affects the plant’s ability to grow in straight lines, creating the characteristic spiralled branches that give it such distinctive character.
Corylus avellana ‘Contorta’
Advantages: Unique architectural form provides year-round interest. Dramatic winter silhouette creates focal points. Catkins provide early nectar for pollinators. Suitable for containers and small gardens.
Considerations: Can be grafted onto straight rootstock that may produce unwanted shoots. Relatively expensive due to slow propagation methods. Limited autumn colour compared to other hazels.
Ideal Situation: Displays best in open locations where twisted branches can be fully appreciated. Tolerates most soil types but prefers well-drained conditions. Excellent as specimen plants or conversation pieces.
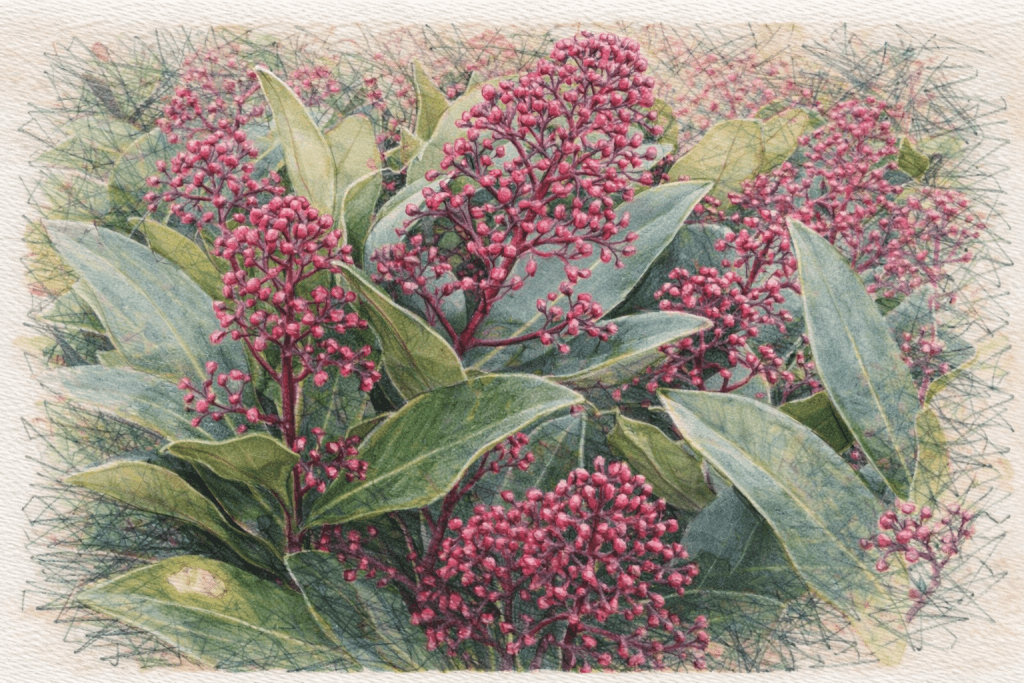
Skimmia japonica ‘Rubella’ – Japanese Skimmia
‘Rubella’ skimmia brings reliable colour to winter gardens through its distinctive red flower buds and bronze-tinted foliage. This compact evergreen maintains its ornamental appeal throughout the darkest months, with deep red buds providing colour from autumn through to spring flowering.
Japanese skimmias arrived in British gardens during the mid-19th century, introduced by plant hunters exploring Japan’s mountainous regions. ‘Rubella’ represents a male selection valued specifically for its winter bud colour and compact growth habit. Traditional Japanese gardens have long appreciated skimmias for their ability to provide colour and structure in shaded areas.
Skimmia japonica ‘Rubella’ – Japanese Skimmia. Winter Interest Shrub
Advantages: Compact size suits small gardens and containers. Reliable winter colour regardless of weather conditions. Aromatic foliage when crushed. Tolerates pollution and urban conditions.
Considerations: Male plants do not produce berries. Requires lime-free soil conditions. Can suffer from phytophthora in waterlogged conditions.
Ideal Situation: Perfect for shaded borders and woodland gardens. Thrives in acidic, humus-rich soil with consistent moisture. Excellent companion for other acid-loving plants like rhododendrons.
Ilex aquifolium ‘J.C. van Tol’ – English Holly
‘J.C. van Tol’ holly provides classic winter appeal through its glossy evergreen foliage and brilliant red berries. This self-fertile cultivar eliminates the usual requirement for separate male and female plants, making it ideal for smaller gardens where space limitations prevent planting multiple specimens.
Holly holds deep cultural significance in British tradition, with its association with Christmas celebrations stretching back to pre-Christian times. Ancient Celts believed holly possessed protective powers, while early Christians adopted it as a symbol of Christ’s crown of thorns. ‘J.C. van Tol’ was selected in the Netherlands during the early 20th century, prized for its reliable berry production and relatively smooth-edged leaves.
Ilex aquifolium ‘J.C. van Tol’ – English Holly. Winter Interest Shrub
Advantages: Self-fertile variety produces berries without requiring separate male plant. Berries provide excellent food source for winter birds. Evergreen foliage maintains year-round structure. Traditional Christmas decoration material.
Considerations: Growth can be slow initially. May require protection from harsh winds when young. Berries attractive to birds may be quickly consumed.
Ideal Situation: Thrives in full sun to partial shade with well-drained soil. Excellent for hedging or specimen planting. Benefits from shelter during establishment period.
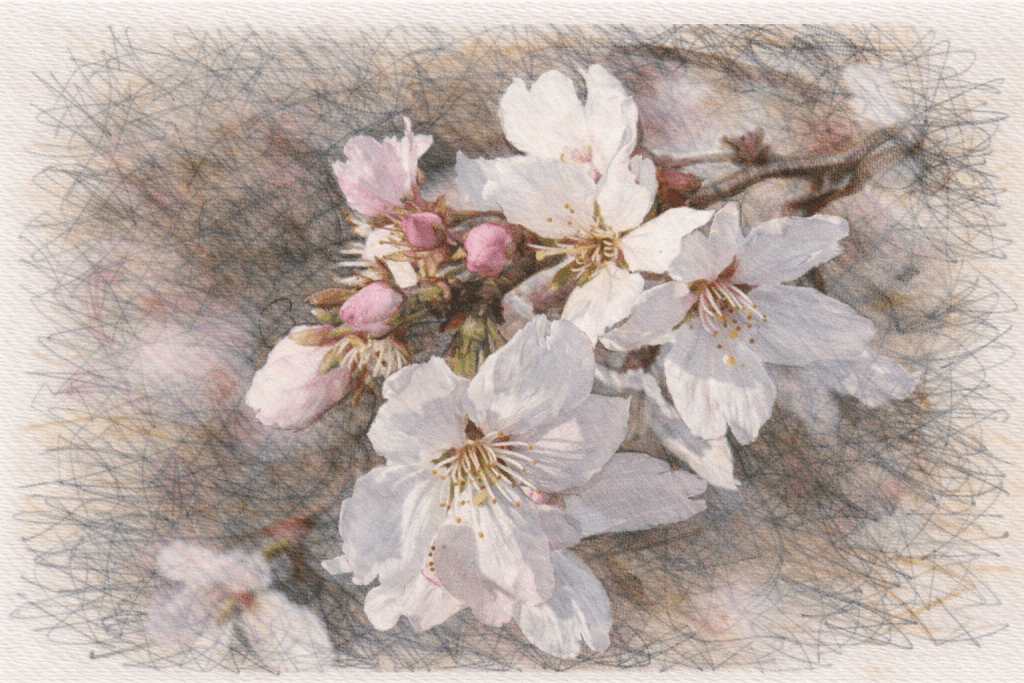
Prunus x subhirtella ‘Autumnalis’ – Autumn Cherry
The autumn cherry defies conventional expectations by producing delicate pink flowers intermittently throughout winter months. This small deciduous tree creates an enchanting display from November through March, with the most prolific flowering occurring during mild spells between cold snaps.
This remarkable cultivar represents centuries of Japanese horticultural expertise, developed through careful selection and breeding programmes. Japanese cherry cultivation dates back over a thousand years, with winter-flowering varieties particularly treasured for their ability to provide beauty during harsh months. The name ‘Autumnalis’ reflects its unusual flowering season, though winter blooms often surpass autumn displays in abundance.
Prunus x subhirtella ‘Autumnalis’ – Autumn Cherry. Winter Interest Shrub
Advantages: Unusual winter flowering period creates garden highlights. Delicate flowers provide nectar for winter-active pollinators. Attractive bark provides additional winter interest. Suitable for smaller gardens due to modest size.
Considerations: Flowers may be damaged by severe frost, reducing display quality. Can be short-lived compared to other flowering trees. May suffer from various cherry diseases.
Ideal Situation: Performs best in full sun with well-drained, fertile soil. Benefits from shelter from harsh winds that can damage delicate flowers. Excellent near seating areas where winter blooms can be appreciated.
‘Jacqueline Postill’ daphne concludes our selection with perhaps the most intoxicating fragrance winter gardens can offer. This semi-evergreen shrub produces clusters of pink and white flowers from December through February, releasing a perfume so intense it can scent entire garden areas.
This cultivar originated from seeds collected in Nepal during the 1960s, representing the remarkable diversity found in Himalayan plant communities. Named after the wife of the nurseryman who first cultivated it, ‘Jacqueline Postill’ has proven to be among the hardiest of the winter-flowering daphnes. The species grows naturally at high altitudes, explaining its tolerance for cold conditions.
Advantages: Exceptional winter fragrance unmatched by most garden plants. Semi-evergreen habit maintains some structure year-round. Relatively compact size suits smaller gardens. Flowers attract winter-flying moths.
Considerations: Can be challenging to establish successfully. Dislikes root disturbance once planted. May suffer sudden death syndrome common to daphnes.
Ideal Situation: Requires excellent drainage and slightly alkaline soil conditions. Benefits from morning sun and afternoon shade. Plant near pathways or windows where fragrance can be fully appreciated.
Creating Your Winter Garden Masterpiece
These ten shrubs represent just the beginning of winter garden possibilities. Success lies in understanding how each plant contributes to the overall composition, creating layers of interest that sustain beauty throughout the coldest months. Consider combining plants with different flowering times to extend the display season, and remember that winter gardens benefit from thoughtful placement where low-angled sunlight can illuminate stems, flowers, and berries to maximum effect.
The rewards of winter gardening extend far beyond aesthetic pleasure. These shrubs provide crucial habitat and food sources for wildlife during harsh months, support early pollinators with nectar and pollen, and remind us that nature’s beauty persists even during the most challenging seasons. Your garden becomes a beacon of life and colour when the wider landscape sleeps, creating a sanctuary that nurtures both wildlife and human spirits throughout winter’s reign.
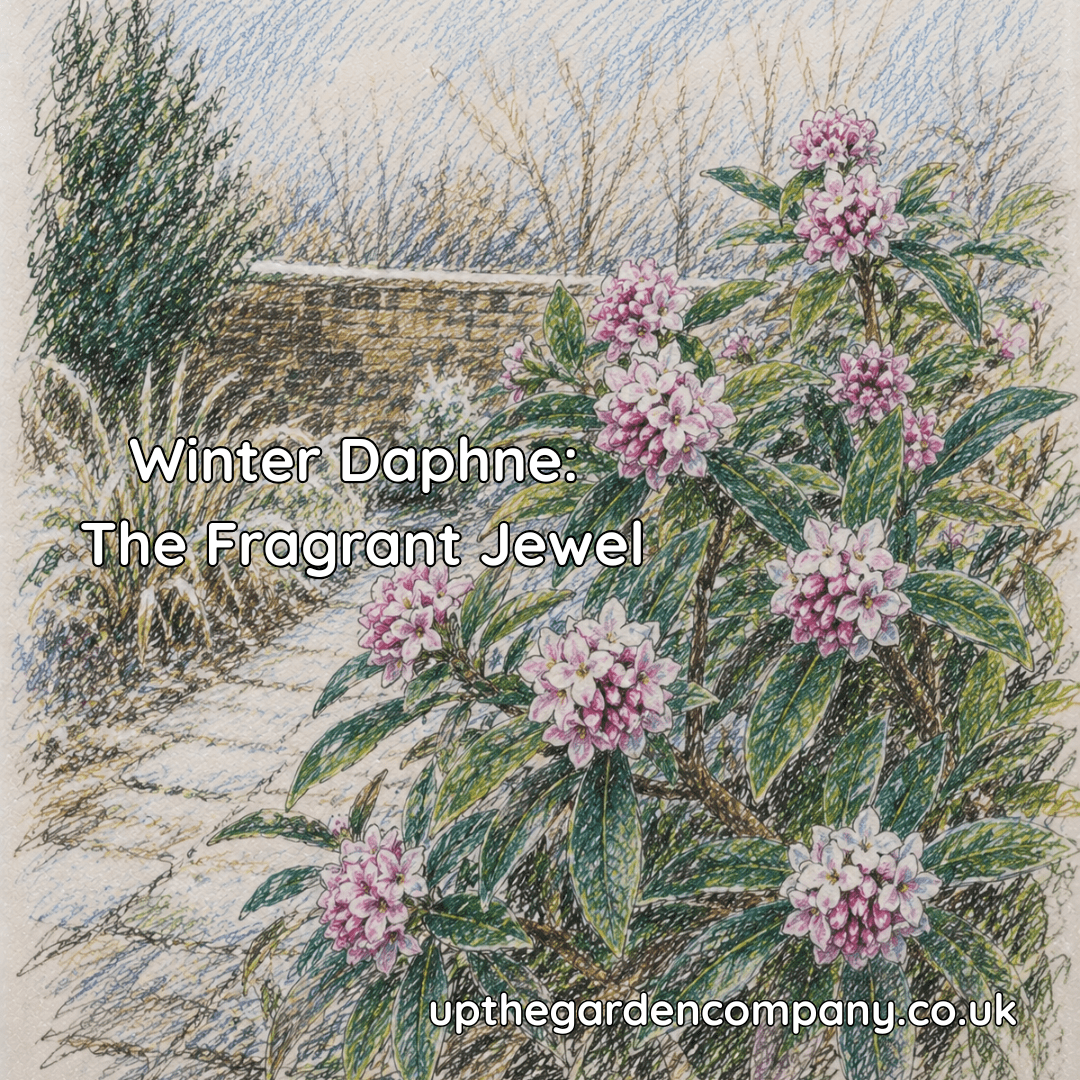
Winter gardens often lack the vibrant colours and intoxicating fragrances that define warmer months. However, one exceptional shrub defies this seasonal limitation with remarkable effectiveness. Daphne odora, commonly known as Winter Daphne, transforms dormant garden spaces into aromatic sanctuaries during the coldest months of the year.
Plant Description and Characteristics
Daphne odora belongs to the Thymelaeaceae family and originates from China and Japan. This evergreen shrub typically reaches heights of 1.2 to 1.5 metres, with a similar spread creating a naturally rounded form. The plant exhibits dense branching patterns that support glossy, leathery leaves measuring approximately 5 to 8 centimetres in length.
Winter Daphne: The Fragrant Jewel
The leaves display a distinctive dark green colouration with smooth margins and prominent parallel veining. Some cultivars feature attractive variegated foliage, with cream or golden edges that provide year-round visual interest. The plant’s compact growth habit makes it suitable for small gardens, borders, and container cultivation.
Winter Daphne produces clusters of small, tubular flowers that measure approximately 1 centimetre in diameter. These blooms appear in terminal clusters containing 10 to 20 individual flowers. The flowers lack petals but feature four petal-like sepals that create the appearance of traditional petals.
Seasonal Interest and Flowering Patterns
The primary appeal of Daphne odora lies in its exceptional flowering period, which typically occurs from February to April. This timing coincides with late winter and early spring, when few other plants provide significant ornamental value.
The flowers emerge as small pink buds that gradually open to reveal white or pale pink blooms with deeper pink exteriors. Popular cultivars include ‘Aureomarginata’, which features variegated foliage, and ‘Alba’, which produces pure white flowers.
The most remarkable characteristic of Winter Daphne is its intensely fragrant blooms. The perfume carries considerable distances and can scent entire garden areas with sweet, spicy notes reminiscent of cloves and vanilla. This fragrance proves particularly valuable during winter months when outdoor spaces typically lack aromatic appeal.
Following the flowering period, the plant may produce small, bright red berries approximately 1 centimetre in diameter. However, fruit production often proves inconsistent in British growing conditions.
Benefits of Growing Winter Daphne
Winter Daphne offers multiple advantages for garden cultivation. The plant provides exceptional winter interest when most other specimens remain dormant or visually unappealing. Its evergreen nature ensures year-round structure and foliage colour in garden borders and containers.
The extraordinary fragrance represents perhaps the greatest benefit of Daphne odora cultivation. The perfume intensity allows single plants to scent considerable garden areas, creating sensory experiences that enhance outdoor spaces during typically barren winter months.
From a wildlife perspective, Winter Daphne flowers provide nectar sources for early pollinators, including bees and beneficial insects that emerge during mild winter periods. This early food source proves valuable for supporting pollinator populations before spring flowers become widely available.
The plant’s compact size makes it suitable for small gardens, urban spaces, and container cultivation. Its slow growth rate reduces maintenance requirements whilst providing consistent ornamental value over extended periods.
Disadvantages and Growing Challenges
Despite its ornamental appeal, Daphne odora presents several cultivation challenges that potential growers must consider. The plant exhibits particular sensitivity to root disturbance, making transplantation difficult once established. This characteristic requires careful initial positioning and long-term planning.
All parts of Winter Daphne contain toxic compounds called daphnanes, which prove poisonous to humans and animals if ingested. The attractive berries pose particular risks to children and pets, requiring careful consideration in family gardens.
The plant demonstrates sensitivity to waterlogged soil conditions, which can lead to root rot and plant death. This requirement necessitates excellent drainage and careful watering management, particularly during wet winter periods.
Winter Daphne can prove challenging to propagate, with cutting success rates often disappointing for amateur gardeners. The plant’s slow growth rate means that establishing sizeable specimens requires considerable patience.
Some individuals may experience skin irritation from handling the plant, particularly the sap. This sensitivity requires protective equipment during pruning and maintenance activities.
Historical Background and Origins
Daphne odora has been cultivated in Chinese and Japanese gardens for over 1,000 years, where it earned recognition as a prized ornamental plant. Chinese horticultural texts from the Song Dynasty (960-1279 CE) reference the cultivation of fragrant daphnes for imperial garden displays.
The plant arrived in European gardens during the 18th century through botanical expeditions to East Asia. The Royal Botanic Gardens, Kew, received its first specimens in the 1770s, beginning the plant’s establishment in British horticulture.
Victorian gardeners particularly valued Winter Daphne for forcing in greenhouses, where the concentrated fragrance could be appreciated during harsh winter weather. The plant became associated with luxury and refinement in 19th-century garden design.
Cultural Folklore and Symbolism
In Chinese culture, Daphne odora holds significant symbolic meaning related to good fortune and prosperity. Traditional beliefs associate the plant’s winter flowering with resilience and hope during difficult periods. Chinese New Year celebrations often feature daphne branches as decorative elements symbolising renewal and positive change.
Japanese folklore connects Winter Daphne with spiritual purification and meditation practices. Temple gardens frequently incorporate the plant near meditation areas, where its fragrance enhances contemplative experiences. The timing of its flowering coincides with early spring festivals celebrating renewal and rebirth.
European folklore adopted similar associations, with Winter Daphne representing hope and perseverance through adversity. Victorian flower language attributed meanings of perseverance and desire to the plant, making it popular for romantic garden displays.
Why Winter Daphne Deserves a Place in Your Garden
Winter Daphne represents an exceptional addition to British gardens seeking year-round interest and sensory appeal. Its unique flowering period fills a crucial gap in seasonal garden displays, providing colour and fragrance when outdoor spaces typically offer limited ornamental value.
The plant’s compact size and slow growth rate make it suitable for modern garden constraints whilst requiring minimal maintenance once established. Its evergreen foliage ensures continuous structure and visual interest throughout the year.
For gardeners prioritising sustainable practices, Winter Daphne offers long-term value with minimal resource requirements. Its drought tolerance once established reduces watering needs, whilst its wildlife benefits support local ecosystem health.
The extraordinary fragrance alone justifies cultivation consideration. Few plants provide such intense and pleasant aromas during winter months, creating outdoor experiences that encourage garden appreciation throughout the year.
Consider positioning Winter Daphne near frequently used pathways, seating areas, or windows where its fragrance can be fully appreciated. With proper care and positioning, this remarkable shrub will provide decades of winter beauty and sensory pleasure.
The Clematis cirrhosa ‘Jingle Bells’ is a popular winter-flowering climber, valued for its ability to provide colour and interest during the coldest months of the year. This guide provides a detailed overview of the plant, including its characteristics, seasonal appeal, and considerations for gardeners.
What is Clematis cirrhosa ‘Jingle Bells’?
Clematis ‘Jingle Bells’ is an evergreen climber belonging to the Ranunculaceae family. It is a cultivar of Clematis cirrhosa, a species native to the Mediterranean region. This particular variety is known for its profuse and fragrant bell-shaped flowers that appear in winter.
Clematis cirrhosa ‘Jingle Bells
The plant features glossy, dark green, trifoliate leaves that provide a lush backdrop for its winter blooms. The foliage can sometimes take on a bronze tint in colder weather, adding another layer of visual interest. It is a vigorous climber, capable of reaching heights of up to 4 metres (approximately 13 feet) and a spread of 1.5 metres (5 feet).
Seasonal Interest
The primary appeal of ‘Jingle Bells’ is its winter flowering period. From December to February, the plant produces an abundance of creamy-white, nodding, bell-shaped flowers. Each flower is approximately 4-6 cm in diameter and has a subtle, citrus-like fragrance, which is more noticeable on mild winter days.
Following the flowering period, the plant develops attractive, silky seed heads, often described as looking like ‘old man’s beard’. These fluffy, silver-white structures persist on the vine well into the spring and summer, extending the plant’s ornamental value beyond its flowering season. During the summer, it is not uncommon for the plant to enter a dormant phase, where it may shed some of its leaves, particularly in hotter, drier climates. This is a natural survival mechanism, and the foliage typically returns as temperatures cool in the autumn.
Benefits for the Garden
There are several advantages to including Clematis cirrhosa ‘Jingle Bells’ in a garden design.
Winter Interest: Its ability to bloom prolifically in winter makes it an invaluable addition to gardens that can otherwise look bare. The cheerful, white flowers stand out against the sparse winter landscape.
Evergreen Foliage: The plant’s evergreen nature ensures year-round structure and coverage, making it ideal for screening unsightly features like fences or sheds.
Wildlife Support: The early flowers provide a much-needed source of nectar for pollinators, such as brave winter bees, that may be active during milder winter spells. The dense foliage also offers shelter for birds and insects.
Low Maintenance: Once established, ‘Jingle Bells’ is relatively low-maintenance. It does not require the complex pruning regimes associated with other clematis groups.
Disadvantages and Considerations
While ‘Jingle Bells’ is a rewarding plant, there are some factors to consider.
Vigorous Growth: Its vigorous nature means it can quickly outgrow a small space. It requires a sturdy support structure, such as a large trellis, wall, or pergola, to climb. Regular monitoring is needed to prevent it from overwhelming neighbouring plants.
Summer Dormancy: The potential for leaf drop during summer can be a drawback for gardeners seeking consistent, lush foliage throughout the year. Planting it amongst other climbers or shrubs can help mask any temporary sparseness.
Pruning Group 1: As it flowers on the previous year’s growth, it falls into Pruning Group 1. This means it requires minimal pruning. Any necessary trimming to control its size or remove dead stems should be done immediately after flowering in late winter or early spring. Pruning at other times of the year will remove the wood that carries the next winter’s flowers.
History and Origin
Clematis cirrhosa, the parent species of ‘Jingle Bells’, has been cultivated for centuries. Native to Southern Europe, North Africa, and the Balearic Islands, it was first described by Carl Linnaeus in 1753. The species name cirrhosa comes from the Latin ‘cirrus’, meaning a tendril, referring to the plant’s clasping leaf stalks that help it climb.
The specific cultivar ‘Jingle Bells’ was introduced to horticulture more recently. It was bred to enhance the desirable traits of the species, specifically for a more prolific flowering display and cleaner white petals. It is a sterile cultivar, which means it does not produce viable seeds, although it does form the ornamental seed heads. This sterility contributes to its extended and abundant flowering period, as the plant directs its energy into producing blooms rather than seeds.
There is no significant folklore specifically associated with the ‘Jingle Bells’ cultivar. However, in the broader Victorian ‘Language of Flowers’, Clematis symbolised mental beauty and ingenuity, likely due to its clever climbing habit.
A Winter Jewel for Your Garden
Clematis cirrhosa ‘Jingle Bells’ is an exceptional plant for any gardener looking to bring life and elegance to the winter garden. Its combination of fragrant, bell-shaped flowers, evergreen foliage and interesting seed heads provides a multi-seasonal display with minimal effort. While its vigorous growth requires consideration, its ability to transform a dormant garden into a vibrant space makes it a highly recommended choice. By providing it with a suitable location and a strong support, you can enjoy its cheerful winter performance for years to come.
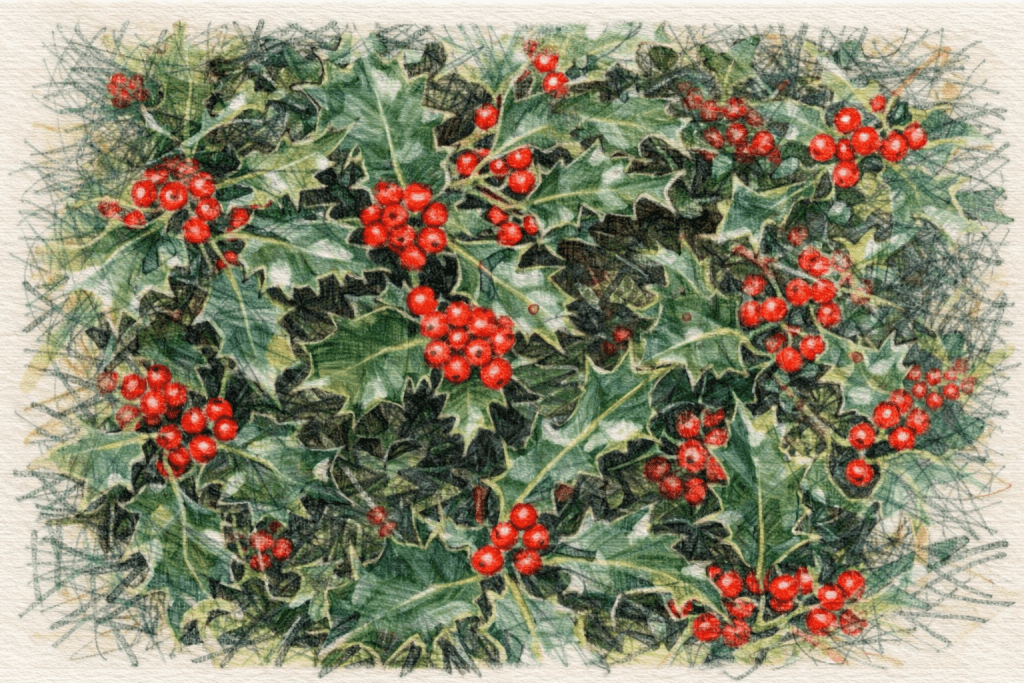
The common holly, or Ilex aquifolium, is one of Britain’s few native evergreen trees. Instantly recognisable by its glossy, spiny leaves and vibrant red berries, it is a plant deeply woven into the country’s landscape and cultural heritage. It is a frequent sight in woodlands, hedgerows and gardens, valued for its ornamental appeal and its importance to wildlife.
All About Ilex aquifolium: Holly
A Description of Common Holly
Ilex aquifolium is a slow-growing, medium-sized evergreen tree or large shrub, typically reaching heights of 10–15 metres, although it can occasionally grow taller. The bark is smooth and silvery-grey, becoming more fissured with age.
The most distinctive feature of the holly is its leaves. They are dark green, thick and leathery with a high-gloss finish on the upper surface. The shape is ovate or elliptical, and the margins are famously spiky, particularly on the lower branches of the plant. These spines are a natural defence mechanism against browsing animals. Leaves on the upper branches, which are out of reach of deer and other herbivores, often have smoother edges.
Ilex aquifolium is dioecious, meaning male and female flowers are produced on separate plants. The flowers are small, white, and have four petals. They appear in late spring and are often inconspicuous, clustered in the leaf axils. For the iconic red berries to form, a female plant must be pollinated by a nearby male plant. These berries, known as drupes, ripen in late autumn and persist throughout the winter, providing a stark, beautiful contrast against the dark green leaves and often a snowy backdrop.
Seasonal Interest of Holly
One of the greatest assets of Ilex aquifolium is its year-round appeal. Its structure and colour provide interest in every season.
Spring: In late spring, from April to May, the holly produces its small, white, sweetly scented flowers. While not visually spectacular, they are attractive to pollinators like bees and hoverflies. New leaf growth also appears at this time, often a lighter, brighter green.
Summer: During the summer months, the holly serves as a dense, structural evergreen. Its glossy leaves provide a lush, dark green backdrop for other, more colourful summer-flowering plants in the garden. If pollination was successful, tiny green berries begin to form.
Autumn: As autumn progresses, the berries on female plants ripen, changing from green to a brilliant scarlet. This provides a vibrant splash of colour just as many other plants are beginning to die back for the winter.
Winter: It is in winter that the holly truly stands out. The combination of its evergreen leaves and bright red berries offers vital colour and life in the dormant garden. This makes it a popular choice for winter displays and, of course, for traditional Christmas decorations. The berries also become a critical food source for birds when other food is scarce.
Benefits of Planting Ilex aquifolium
Beyond its aesthetic value, holly offers several practical and ecological benefits.
Wildlife Support: The dense, prickly foliage provides excellent shelter and nesting sites for birds, while small mammals can find protection from predators within its branches. The flowers are a source of nectar for pollinators in spring, and the berries are a vital winter food for birds such as blackbirds, thrushes and redwings.
Hedging and Screening: Due to its dense growth and spiny leaves, holly makes an excellent, intruder-proof hedge. It can be clipped into a formal shape or left to grow more naturally. Its evergreen nature ensures it provides an effective screen for privacy throughout the year.
Low Maintenance: Once established, Ilex aquifolium is a very resilient and low-maintenance plant. It is tolerant of a wide range of soil types, pollution, and shady conditions, making it suitable for many different garden environments, including urban settings.
Potential Disadvantages
While a valuable garden plant, there are a few considerations to keep in mind when planting holly.
Toxicity: The berries of Ilex aquifolium are mildly toxic to humans, and ingestion can cause stomach upset. Care should be taken if planting in areas frequented by young children.
Spiny Leaves: The sharp spines on the leaves can make pruning and handling the plant uncomfortable without protective gloves. Fallen leaves can also be a nuisance in lawn areas or on paths.
Dioecious Nature: To ensure a supply of berries, it is necessary to plant both male and female varieties. If space is limited, this can be a drawback. However, some self-fertile cultivars are available, such as Ilex aquifolium ‘J.C. van Tol’, which produce berries without a male pollinator.
Holly: History and Folklore
Holly has a rich history and is steeped in folklore, particularly within Celtic and Roman traditions. Long before its association with Christmas, it was considered a sacred plant by the Druids. They believed it to be a symbol of fertility and eternal life, a belief stemming from its ability to remain green throughout the winter when other plants appeared to die. It was thought to have protective powers and people would bring its branches into their homes to ward off evil spirits.
The Romans also held holly in high regard. It was associated with Saturn, the god of agriculture and harvest. During the festival of Saturnalia, a week-long celebration in mid-December, Romans would decorate their homes with holly wreaths and give them as gifts to symbolise goodwill.
With the advent of Christianity, these pagan traditions were absorbed and repurposed. The spiny leaves of the holly came to represent the crown of thorns worn by Christ, and the red berries his blood. As a result, holly became firmly established as a traditional Christmas decoration, a symbol of hope and resurrection during the darkest time of the year.
Holly: An Essential Addition to the Garden
Ilex aquifolium is more than just an attractive evergreen; it is a plant of great character, ecological importance, and cultural significance. Its ability to provide year-round structure, colour and vital support for wildlife makes it an invaluable addition to any garden.
Whether used as a standalone specimen tree, a dense security hedge, or a container plant for a patio, the common holly offers a unique combination of beauty and utility. By planting this native species, gardeners can create a visually appealing space while also contributing to the local ecosystem and continuing a tradition that stretches back for centuries.
The chrysanthemum, often simply called “mum,” is a flowering plant with a rich history and significant cultural importance across the globe. Recognised for its vibrant, densely petaled blooms, it is a staple in autumn gardens and floral arrangements.
What is a Chrysanthemum?
Chrysanthemums belong to the genus Chrysanthemum in the Asteraceae family, which also includes daisies and sunflowers. The name originates from the Greek words “chrysos” (gold) and “anthemon” (flower). While the original flowers were indeed golden, modern cultivation has produced a vast array of colours, including white, yellow, pink, red, bronze and purple.
Chrysanthemum
The plants are herbaceous perennials, though some varieties are grown as annuals. Their flowers come in numerous forms, such as single, decorative, pompon and spider types, each with a unique petal arrangement. The leaves are typically lobed and aromatic, adding to the plant’s appeal.
Seasonal Interest
Chrysanthemums are best known as autumn-flowering plants. They are “short-day” plants, meaning they require long nights to initiate budding and flowering. This photoperiodic characteristic ensures that they produce their spectacular display of blooms from late summer through autumn, often continuing until the first hard frost.
This late-season flowering makes them invaluable in the garden, providing a burst of colour when many other plants have finished blooming for the year. They are frequently used in seasonal container displays, garden beds, and borders to extend the gardening season.
Benefits of Growing Chrysanthemums
Beyond their ornamental value, chrysanthemums offer several practical benefits:
Pest Control: Certain species, particularly Chrysanthemum cinerariifolium, are the source of pyrethrum, a natural insecticide. Planting chrysanthemums in a garden can help deter pests from neighbouring plants.
Air Purification: A NASA study identified chrysanthemums as effective air purifiers. They have been shown to help remove common indoor pollutants such as ammonia, benzene, and formaldehyde from the air, making them a functional houseplant.
Pollinator Support: Late-blooming chrysanthemums provide a crucial source of nectar for bees and other pollinators when other food sources are scarce.
Medicinal and Culinary Uses: In traditional Chinese medicine, chrysanthemum tea is used to treat various ailments, including fever, sore throat and high blood pressure. The flower petals of some edible varieties can be used in salads and other dishes.
Disadvantages and Considerations
While beneficial, there are a few drawbacks to consider when growing chrysanthemums. The plants can be susceptible to fungal diseases like powdery mildew and rust, especially in humid conditions with poor air circulation. They may also be targeted by pests such as aphids and spider mites.
Furthermore, all parts of the chrysanthemum plant are mildly toxic to pets, including cats and dogs, if ingested. Consumption can lead to symptoms like vomiting, diarrhoea, and loss of coordination. Therefore, they should be planted with care in households with animals.
The History of the Chrysanthemum
The chrysanthemum has a long and storied history, dating back to 15th century B.C. China, where it was first cultivated. It was initially grown as a flowering herb and was highly valued for its medicinal properties. The flower held such importance that an entire city was named after it: Chu-Hsien, meaning “Chrysanthemum City.”
By the 8th century, the chrysanthemum had been introduced to Japan, where it was so revered by the Emperor that it was adopted as the Imperial Seal. The “Festival of Happiness” in Japan or Kiku no Sekku, is dedicated to the flower.
The chrysanthemum was introduced to the Western world in the 17th century. In 1753, the Swedish botanist Carl Linnaeus formally named the flower. Since then, its popularity has grown, and it is now one of the most widely cultivated ornamental flowers in the world.
Folklore and Symbolism
The symbolism of the chrysanthemum varies significantly across different cultures.
In Asia: In China and Japan, it represents longevity, happiness, and good fortune. The white chrysanthemum, in particular, is a symbol of loyalty and devoted love.
In Europe: In many European countries, including France, Belgium, and Italy, chrysanthemums are associated with death and are traditionally used as funeral flowers to honour the deceased.
In Australia: Chrysanthemums are the official flower for Mother’s Day, largely due to their seasonal availability in May.
In the United States: The flower is generally seen as a cheerful and positive symbol, often associated with joy and optimism.
A Valuable Addition to Your Garden
With its brilliant autumn colours and diverse forms, the chrysanthemum is an excellent choice for any garden. It offers visual appeal late in the season when few other plants are in bloom. Beyond its beauty, its ability to deter pests and support pollinators adds practical value. By understanding its needs and historical significance, you can fully appreciate this remarkable flower. Consider adding chrysanthemums to your garden beds or containers for a reliable and vibrant display of autumn colour.
The common poppy, known scientifically as Papaver rhoeas, is one of the most recognisable wildflowers in the British landscape. With its delicate, paper-thin petals and vibrant scarlet hue, this annual plant has graced fields, meadows and gardens for centuries. It holds significant cultural and historical weight, making it more than just a fleeting summer bloom.
A Description of Papaver rhoeas
The common poppy is an annual herbaceous plant belonging to the Papaveraceae family. It is distinguished by its striking features:
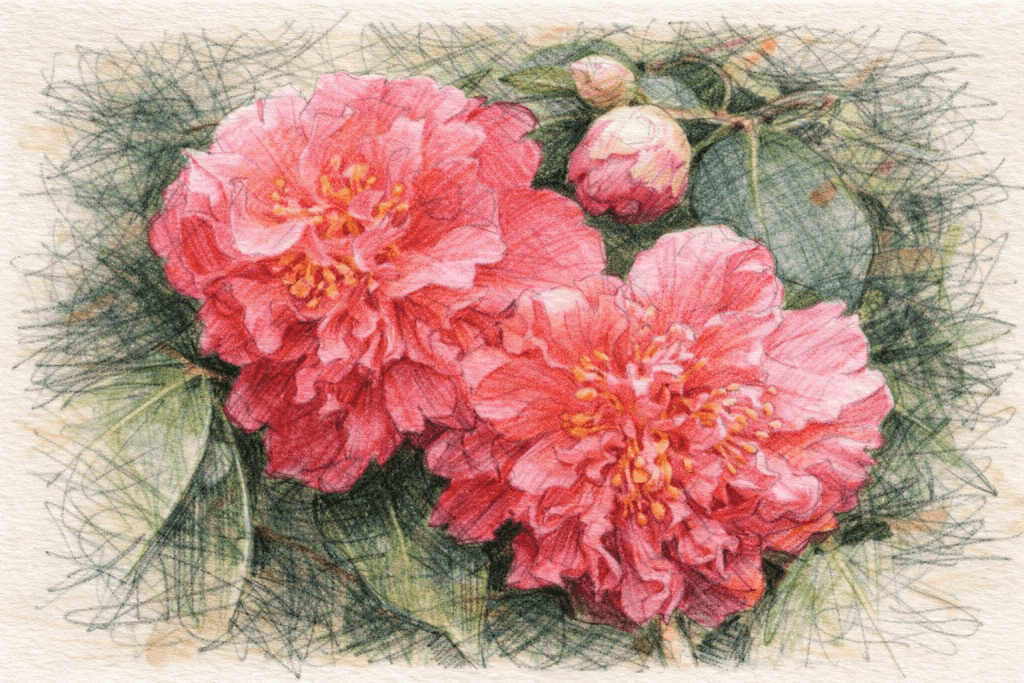
Flowers: The most prominent feature is the flower, which typically measures 5 to 10 cm in diameter. Each flower consists of four large, overlapping petals that are vivid scarlet in colour. Often, there is a black spot at the base of each petal. The petals are delicate and have a texture similar to crepe paper. In the centre, a ring of dark stamens surrounds the stigma.
Stems and Leaves: The plant grows on long, thin stems that are covered in coarse, bristly hairs. These stems can reach a height of 20 to 60 cm. The leaves are pinnately lobed, meaning they are divided into deep, irregular segments, giving them a feathery appearance.
Seed Pod: After flowering, the petals fall away to reveal a ribbed, hairless seed capsule. This capsule is ovoid and contains hundreds of tiny, kidney-shaped seeds. When mature, pores open just below the stigma, allowing wind to disperse the seeds as the stem sways. This “pepper-pot” mechanism ensures wide distribution.
Seasonal Interest
The common poppy offers distinct seasonal interest, primarily during the spring and summer months. Its life cycle is closely tied to the agricultural calendar, as it is an archetypal weed of arable land.
Spring: Seeds typically germinate in the autumn or early spring when the soil has been disturbed. Young seedlings form a rosette of leaves that lies close to the ground throughout the winter.
Summer: As temperatures rise, the plant sends up its flowering stems. The main flowering period is from June to August. During this time, fields and verges can be covered in a spectacular blaze of red, creating a powerful visual impact. Each individual flower is short-lived, often lasting only a day, but a single plant will produce a succession of blooms.
Autumn: Once flowering is complete and the seed pods have dried and dispersed their contents, the parent plant dies back. The seeds lie dormant in the soil, often for many years, waiting for the right conditions—primarily light and soil disturbance—to trigger germination.
Benefits of the Common Poppy
Beyond its aesthetic appeal, Papaver rhoeas offers several ecological and practical benefits.
Support for Pollinators: The flowers are an excellent source of pollen for various insects, especially bees. Although they do not produce nectar, the abundance of pollen makes them a valuable food resource for pollinators during their peak flowering season.
Minimal Cultivation Needs: As a wildflower, the common poppy is adapted to grow in poor, well-drained soils. It requires minimal care, no fertiliser and is relatively drought-tolerant once established. This makes it a sustainable choice for informal or wildlife-friendly gardens.
Medicinal and Culinary Uses: Historically, parts of the plant have been used in traditional medicine. The petals were used to create a syrup for mild pain relief and to soothe coughs. The seeds are edible and can be used in baking and cooking, similar to the seeds of the opium poppy (Papaver somniferum), though they contain no opiates.
Disadvantages of the Plant
While beautiful, the common poppy also has characteristics that can be disadvantageous in a managed garden setting.
Prolific Self-Seeding: Its primary survival strategy is to produce a vast number of seeds that can remain viable in the soil for decades. This can lead to it becoming invasive in cultivated flower beds, where it may outcompete more delicate plants.
Ephemeral Nature: The individual flowers are very short-lived, and the plant dies completely after setting seed. It does not provide any structural interest in the garden during the autumn and winter months.
Toxicity: Like other members of the Papaveraceae family, Papaver rhoeas contains alkaloids that are mildly toxic if ingested. While the risk is low, caution is advised, particularly around children and pets. The seeds are safe for consumption, but other parts of the plant are not.
History and Folklore
The common poppy has a rich history intertwined with human civilisation. Its association with agriculture means it has followed humanity’s expansion across Europe, North Africa, and temperate Asia.
Its seeds have been found in archaeological sites dating back to the Neolithic period, indicating its long-standing presence as a weed in early grain crops. In ancient Egypt, poppies were included in burial tombs, and the Greeks and Romans associated the flower with gods of sleep, death, and agriculture, such as Hypnos, Thanatos and Demeter.
In British folklore, the poppy was associated with various superstitions. It was considered bad luck to bring poppies into the house, with some believing it would cause headaches or even trigger thunderstorms.
The most profound modern symbolism stems from the First World War. The battlefields of Flanders were heavily churned by shelling, creating ideal conditions for poppy seeds to germinate. The resulting blankets of red across the ravaged landscape inspired the Canadian physician Lieutenant-Colonel John McCrae to write his famous poem, “In Flanders Fields.” Following the war, the poppy was adopted by the Royal British Legion as a symbol of remembrance for fallen soldiers, a tradition that continues to this day.
A Welcome Addition to the Garden
The common poppy, Papaver rhoeas, is a plant of striking beauty and profound symbolism. Its vibrant summer display brings life to any garden and provides a vital food source for pollinators. While its tendency to self-seed requires some management, its resilience and low maintenance needs make it an excellent choice for wildflower meadows, cottage gardens, or informal borders.
By cultivating this iconic flower, gardeners can not only enjoy its fleeting beauty but also connect with a plant that has been part of our natural and cultural heritage for thousands of years.
The common camellia, scientifically known as Camellia japonica, stands as one of the most rewarding evergreen shrubs for British gardens. This remarkable plant delivers spectacular blooms during the darker months when most gardens lie dormant, providing essential colour and structure from late winter through early spring. Understanding this plant’s characteristics, benefits and requirements enables gardeners to make informed decisions about incorporating this valuable species into their outdoor spaces.
Camellia japonica: For the Winter Garden
Originating from East Asia, Camellia japonica has established itself as a cornerstone plant in temperate gardens worldwide. Its ability to thrive in partially shaded conditions whilst producing abundant flowers makes it particularly suitable for British growing conditions. The species offers gardeners a reliable source of winter interest combined with year-round structural value.
Plant Description and Characteristics
Camellia japonica typically grows as a dense, upright shrub reaching heights of 3-6 metres when fully mature. The plant develops a naturally rounded habit with glossy, dark green leaves that measure 5-10 centimetres in length. These leathery, evergreen leaves provide consistent foliage throughout the year, creating an attractive backdrop for the plant’s distinctive flowers.
The flowers represent the plant’s most striking feature, appearing in various forms including single, semi-double, and fully double varieties. Flower sizes range from 7-12 centimetres across, with colours spanning pure white, pink, red, and bicoloured combinations. Each bloom typically contains five petals in single forms, whilst double varieties may display numerous overlapping petals creating rose-like formations.
The plant’s root system develops as shallow and fibrous, requiring consistent moisture but excellent drainage. This characteristic influences planting location selection and ongoing maintenance requirements throughout the growing season.
Seasonal Interest and Blooming Pattern
Camellia japonica provides exceptional seasonal value, with flowering typically occurring from February through April in British gardens. This extended blooming period coincides with the latter portion of winter and early spring, when few other flowering shrubs provide comparable colour intensity.
The flowering sequence progresses gradually, with individual blooms lasting 7-14 days depending on weather conditions. Cool temperatures extend bloom duration, whilst warm spells accelerate flower development and fade. This natural timing creates sustained interest rather than brief floral displays.
Following the flowering period, the plant maintains its ornamental value through dense, evergreen foliage that provides structure and screening throughout summer and autumn months. The leaves occasionally develop bronze or reddish tints during colder periods, adding subtle seasonal variation to the plant’s appearance.
New growth emerges in late spring following flower completion, with fresh shoots displaying lighter green colouration before maturing to the characteristic dark green finish. This growth pattern ensures the plant maintains its dense, well-furnished appearance year-round.
Benefits and Garden Value
The primary benefit of Camellia japonica lies in its ability to provide substantial winter colour when garden interest typically diminishes. This flowering timing fills a crucial gap in the gardening calendar, offering vibrant blooms during months when most perennials remain dormant and deciduous shrubs lack foliage.
The evergreen nature of the plant provides year-round structure, making it valuable for creating privacy screens, hedging, or specimen plantings. The dense foliage offers wildlife benefits, providing shelter for birds and small mammals throughout winter months.
Camellia japonica demonstrates excellent longevity, with established plants continuing to flower reliably for decades with minimal intervention. This characteristic makes it a sound investment for long-term garden planning and development.
The plant’s tolerance for partial shade expands planting options in gardens with limited full-sun exposure. This adaptability allows gardeners to utilise areas beneath trees or in north-facing locations that prove challenging for many flowering shrubs.
Cut flowers from established plants provide excellent indoor displays, with blooms lasting 5-7 days in water when properly conditioned. This utility extends the plant’s value beyond garden display into home decoration applications.
Potential Disadvantages
Camellia japonica requires specific growing conditions to perform optimally, potentially limiting its suitability in certain garden situations. The plant demonstrates sensitivity to alkaline soils, requiring acidic conditions with pH levels between 5.0-6.5 for healthy growth.
Water requirements prove critical, with the plant requiring consistent moisture whilst simultaneously demanding excellent drainage. This balance can prove challenging in heavy clay soils or areas prone to waterlogging during winter months.
Cold wind exposure can damage both foliage and flower buds, necessitating sheltered planting locations in exposed gardens. This requirement may limit placement options in coastal or elevated sites experiencing strong prevailing winds.
The plant’s shallow root system makes it susceptible to drought stress during extended dry periods, requiring regular irrigation during summer months. This maintenance requirement increases in container-grown specimens.
Flower drop can occur following sudden temperature changes or water stress, potentially reducing the anticipated display quality during peak blooming periods.
Historical Background and Cultural Significance
Camellia japonica originates from the mountainous regions of Japan, Korea, and eastern China, where it grows naturally in woodland understories. The plant was first introduced to European cultivation during the 18th century through trade connections with East Asia.
The species gained particular prominence in British gardens during the Victorian era, when exotic plant collecting reached its peak. Wealthy estate owners competed to acquire the finest varieties, establishing extensive camellia collections in purpose-built conservatories and sheltered woodland gardens.
The development of hardy cultivars suitable for outdoor cultivation in British climates occurred throughout the 19th and 20th centuries. Plant breeders focused on improving cold tolerance whilst maintaining flower quality and variety.
Folklore and Cultural Associations
Traditional East Asian cultures associate camellias with longevity, faithfulness, and perfect love. In Japanese culture, the camellia symbolises divine beauty and represents the ephemeral nature of life, themes reflected in classical poetry and art.
Victorian flower language attributed meanings of admiration and perfection to camellias, with different colours conveying specific messages. Red camellias symbolised passionate love, whilst white varieties represented adoration and pure affection.
Some regional folklore suggests that planting camellias near dwelling entrances provides protection against negative influences whilst attracting positive energy to the household.
Why Camellia japonica Deserves a Place in Your Garden
Camellia japonica offers unique value proposition for British gardens through its reliable winter flowering, evergreen structure, and adaptability to partial shade conditions. The plant’s ability to provide substantial colour during the most challenging months of the gardening year makes it an essential addition to well-planned outdoor spaces.
The species’ proven longevity and low maintenance requirements once established provide excellent value for garden investment. With proper siting and initial care, a camellia can provide decades of reliable performance with minimal ongoing intervention.
For gardeners seeking to extend seasonal interest and create year-round structure, Camellia japonica represents an excellent choice that delivers both immediate impact and long-term garden value. The combination of spectacular flowers, attractive foliage, and cultural significance creates a plant worthy of consideration for any temperate garden setting.
Hypericum perforatum, commonly known as St. John’s Wort, is a plant with a long and storied history. Recognised for its bright yellow flowers, it has been used for centuries in traditional medicine and holds a significant place in folklore.
Description of the Plant
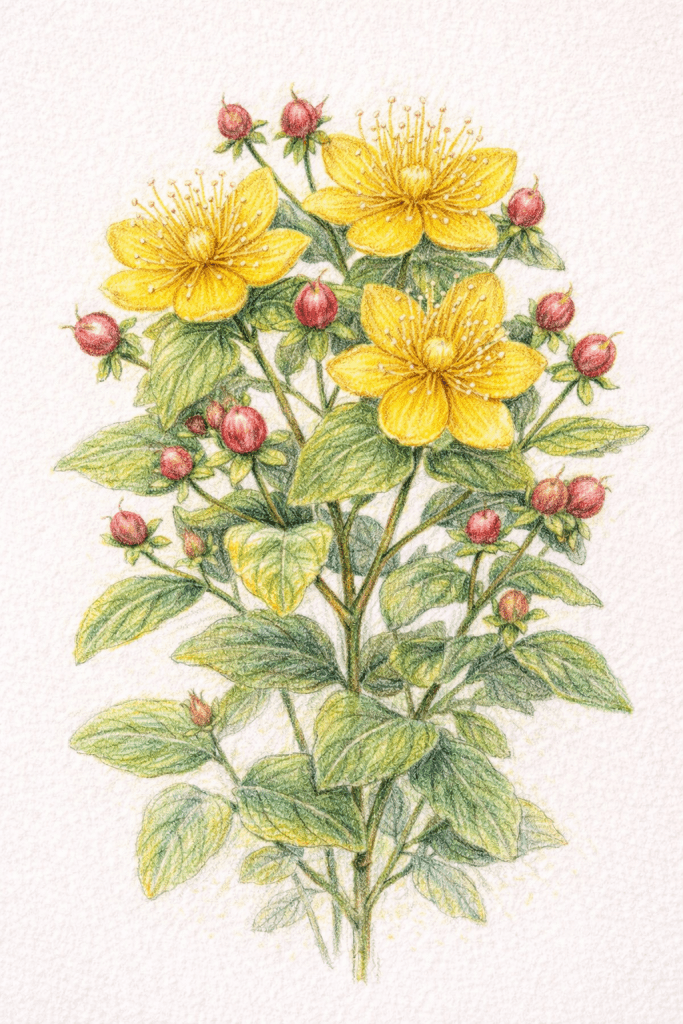
St. John’s Wort is a perennial herbaceous plant that typically grows to a height of 30 to 90 centimetres. It features a woody, branched root system and erect, branching stems. The stems are often reddish and have two opposite longitudinal ridges, a key identifying feature.
The leaves are stalkless, oblong, and arranged in opposite pairs along the stem. They measure between one and three centimetres in length. When held up to the light, the leaves reveal translucent dots, which are oil glands containing the plant’s active compounds. These give the species name perforatum, from the Latin for “perforated”.
St. John’s Wort
From late spring to mid-summer, the plant produces clusters of star-shaped, five-petaled yellow flowers at the ends of its upper branches. Each flower is about two to three centimetres in diameter with prominent stamens. If the petals are crushed, they release a reddish-purple oil. Following the flowering period, the plant develops small, dark-red to black berries or seed capsules.
Seasonal Interest
St. John’s Wort offers visual appeal throughout much of the year, making it a valuable addition to gardens.
Spring: In spring, the plant emerges with fresh green foliage, providing a base for the display to come.
Summer: The peak season for St. John’s Wort is from June to August, when it is covered in a profusion of bright yellow flowers. This extended blooming period provides consistent colour in garden beds and borders. The flowers are also highly attractive to pollinators such as bees and butterflies.
Autumn: After flowering, the plant produces decorative berries. These start as green and mature to shades of red and black, adding interest to the autumn garden and providing a food source for birds.
Winter: While the foliage dies back in colder climates, the woody stems can provide some structural interest in the winter landscape, especially when dusted with frost.
Benefits of Cultivating St. John’s Wort
Growing Hypericum perforatum in a garden setting offers several advantages:
Pollinator Attraction: The flowers are a rich source of nectar and pollen, attracting a wide variety of bees, butterflies, and other beneficial insects, which can help to support local ecosystems and pollinate other garden plants.
Drought Tolerance: Once established, St. John’s Wort is relatively drought-tolerant, making it suitable for low-maintenance and water-wise gardening schemes.
Pest and Disease Resistance: The plant is generally robust and not susceptible to many common garden pests or diseases. Its natural chemical compounds may deter some herbivores.
Medicinal Heritage: For those interested in herbalism, growing St. John’s Wort provides access to a plant with a significant history of medicinal use, primarily for its association with mood support.
Disadvantages and Considerations
Despite its benefits, there are important considerations to be aware of when cultivating St. John’s Wort:
Invasiveness:Hypericum perforatum can be invasive in some regions. It spreads through both seeds and creeping rhizomes, and can quickly colonise disturbed areas, outcompeting native flora. In several countries, including Australia and parts of North America, it is classified as a noxious weed. It is essential to check local regulations before planting.
Toxicity to Livestock: The plant contains hypericin, which can cause photosensitivity in livestock, particularly in light-skinned animals. If ingested in large quantities, it can lead to skin irritation, blistering, and other health issues when the animal is exposed to sunlight.
Medical Interactions: Preparations made from St. John’s Wort are known to interact with a wide range of prescription medications, including antidepressants, birth control pills and blood thinners. Its use should always be discussed with a healthcare professional.
History and Folklore
The common name, St. John’s Wort, is tied to John the Baptist. The plant typically blooms around St. John’s Day, which is on the 24th of June. Folklore holds that the red spots appearing on the leaves are symbolic of the blood of St. John after his beheading.
Historically, its uses are well-documented. Ancient Greeks, including physicians like Dioscorides, used it for a range of ailments. It was traditionally employed to treat wounds, burns, and nerve pain, earning it names such as “the devil’s scourge” because it was believed to ward off evil spirits. During the Middle Ages, it was hung in doorways and windows to protect households from malevolent forces and lightning.
The plant’s association with light is also prominent in its folklore. The bright yellow flowers were thought to capture the power of the sun, and it was used to bring light into the “darkness” of the mind, a belief that foreshadows its modern use for mood-related conditions.
A Plant of Sun and Story
Hypericum perforatum is more than just a common wildflower; it is a plant with deep historical roots and distinct characteristics. Its bright, sunny flowers offer significant seasonal interest and support local wildlife, making it an attractive choice for gardeners. However, its potential for invasiveness and toxicity requires responsible cultivation.
For those looking to add a plant with a rich backstory and reliable summer colour to their garden, St. John’s Wort is a compelling option. By understanding its nature and managing it appropriately, gardeners can enjoy the beauty and heritage of this ancient and fascinating plant.