Brighten up your winter garden with the dazzling burst of yellow from the Winter Aconite, a plant that brings hope and colour to the bleakest days. This captivating flower has been a cherished gem among gardeners and nature enthusiasts for centuries, holding fascinating stories and delightful benefits within its golden petals.
Botanical Name
The Winter Aconite may be known for its common name, but its scientific identity as Eranthis hyemalis adds an air of elegance and mystery. This member of the buttercup family is a masterpiece of nature, combining resilience and beauty in equal measure.
A Brief History of the Winter Aconite
The Winter Aconite has deep roots in European and Mediterranean history. Native to the woodlands of Southern Europe, this hardy plant has been celebrated for centuries as one of the earliest signs of spring. Monks in medieval monasteries prized its bright, sunshine-like blooms, often planting them in cloisters to symbolise hope and renewal during the cold winter months. Victorian gardeners, always on the lookout for seasonal treasures, popularised its use in English country gardens, where its cheerful presence continues to enchant today.
When Does the Winter Aconite Bloom?
Imagine stepping into a frosty garden in the late winter or early spring, only to be greeted by a carpet of luminous yellow blooms peeping through the snow. That’s the magic of the Winter Aconite—its charm lies in being one of the first flowers to bloom each year, typically from January to March. It thrives in partial shade, often found adorning the woodland floor, under deciduous trees or scattered along pathways.
Benefits of the Winter Aconite
Pollinator Paradise: These early bloomers are a lifeline for bees, providing them with essential nectar and pollen during the colder months when food sources are scarce. Planting Winter Aconites supports biodiversity and helps wildlife thrive.
Low Maintenance: Once established, these perennials are incredibly easy to care for. They’re hardy, resistant to frost and incredibly adaptable to different soil types.
Natural Beauty: Beyond their ecological benefits, Winter Aconites form beautiful ground cover, adding charm and brightness to shaded areas of your garden.
Symbol of Renewal: Their vibrant emergence during the dormant months offers an inspiring reminder of resilience and the promise of new beginnings.
Poems, Housewives’ Tales and Old Stories
The Winter Aconite has inspired folklore, poetry and even a touch of old-fashioned superstition.
One housewives’ tale claims that planting Winter Aconites at the entrance of a home wards off negativity, bringing light and positivity to the household.
A common medieval belief suggested that the golden flowers were tiny “lanterns of hope” dropped by fairies to guide weary travellers through the woods.
Poets have drawn inspiration from this resilient flower for centuries. Its bright petals, piercing through the snowy silence of winter, often symbolised hope and renewal in their verses.
Common Names
Like any beloved plant, the Winter Aconite has collected a delightful array of nicknames over the years. Some of the most popular include:
Winter Wolf’s Bane (due to its resemblance to the poisonous aconite plant, despite being unrelated)
Spring Herald (a nod to its role in announcing the arrival of the new season)
Golden Winter Star, capturing its luminous glow in the garden’s cold months.
Bring the Winter Aconite to Your Garden
Are you ready to bring a touch of magic to your winter garden? Planting Winter Aconites is simple, yet the rewards are profound. Add these golden blooms to your outdoor space, and watch your garden transform into a landscape of hope and beauty, even in the chilliest months.
Whether you’re an avid gardener or someone nurturing a newfound love for plants, the Winter Aconite is a must-have addition. It’s not just a flower—it’s an experience. A burst of sunshine, a beacon of resilience and a celebration of nature’s enduring charm.
Now, go ahead, inspire your garden, and celebrate the joy that only a winter garden can bring!
Meet the fascinating Hamamelis, better known as the mystical Witch Hazel. This enchanting shrub has captured the hearts of gardeners, nature enthusiasts and storytellers alike for centuries. But there’s more to this plant than its bewitching name—it’s an abundant source of beauty, lore and even healing properties.
A Plant with a Story – The History of Witch Hazel
Imagine stepping into ancient woodlands where the Witch Hazel’s crinkled yellow blooms light up the crisp winter air like fairy lanterns. This plant’s rich history spans continents and centuries, with its origins deeply rooted in North America. Indigenous peoples valued it for its medicinal magic, using its bark and leaves to treat a myriad of ailments.
Later, European settlers, captivated by the plant’s healing properties, embraced it as both a remedy and a symbol of winter resilience. Its name “witch hazel” is thought to come from the Old English word wice, meaning “pliant” or “bendable,” referring to the plant’s flexible branches which were often used as dousing rods to locate water.
When Does Witch Hazel Bloom?
While most plants lay dormant in the gloomier months, the Witch Hazel refuses to wait for spring’s arrival! This marvel of nature bursts into bloom between late autumn and early winter, often flowering through the chill of January and February. Can you picture its delicate, spidery ribbons of yellow, orange and red dancing in the frost?
Gardens come alive with the Witch Hazel’s unique beauty when little else dares to bloom. Its vivid flowers provide a welcome splash of colour against the backdrop of barren trees and snow-dusted soil.
Witch Hazel’s Benefits – A Gift of Nature
Think it’s just a pretty face? Think again! Witch Hazel is equally cherished for its practical uses.
Medicinal Properties: Renowned for its soothing effects, Witch Hazel extract is a staple in skincare. Its natural astringent qualities calm inflammation, refine pores and speed up recovery for minor skin irritations.
Wildlife Friendly: This shrub is a magnet for pollinators like bees, offering them nectar at a time when food sources are scarce.
Hardy Landscaping: Easy to care for, Witch Hazel adds structure and charm to any garden. It thrives in partial shade and well-drained soil, making it perfect for even beginner gardeners.
It’s not just a plant—it’s an ally in both wellness and environmental harmony.
Tales and Folklore of the Witch Hazel
The Witch Hazel’s mystique doesn’t end with its name. Delve into folklore, and you’ll encounter housewives’ tales and poetic odes celebrating its charm.
Water Divination – As mentioned earlier, its flexible branches were used by dowsers to locate underground water—a skill that earned the plant its “witch” reputation, hinting at a touch of the mystical.
Healing Stories – It was once believed that carrying a sprig of Witch Hazel could ward off evil spirits and promote good health. Some even hung it near their doorways to invite luck into their homes.
Poetic Beauty – Many have waxed lyrical about this shrub’s resilience in frosty winters. A Native American poem beautifully describes it as “the fires of the forest,” a reference to its bright, spidery blossoms glowing like flames against the snow.
Known by Many Names
Witch Hazel might be its most popular moniker, but like all captivating things, it goes by many names! Here are some of its other aliases that you might come across:
Winter Bloom – Truly fitting for its seasonal flowering.
Snapping Hazelnut – Named for the satisfying pop of its seed pods when they burst.
Spotted Alder – Although unrelated to alder, its bark texture earned it this label.
Bring a Touch of Witch Hazel Magic to Your Garden
The Witch Hazel is truly a gardener’s delight—a plant with a rich story, striking blooms, environmental benefits, and an unmistakable charm. Imagine sipping a cup of tea on a cold winter’s morning, gazing into your garden where this spirited shrub defies the frost to put on its dazzling display.
Are you ready to bring this enchanting plant into your own outdoor space? Whether you’re planting a magical hedge or adding contrast to your winter garden, the Witch Hazel is a touch of nature’s poetry that no garden should be without.
Have you ever wished for a more sustainable approach to handle kitchen scraps while enriching your garden soil? Say hello to the wormery, a game-changer for home composting enthusiasts, sustainability advocates and green thumbs everywhere.
Picture this – an elegant bin teeming with industrious worms transforming your kitchen waste into nutrient-rich compost, right in the comfort of your own home.
What is a Wormery?
At its heart, a wormery is a compact, odour-free composting system that uses worms to break down organic waste. Unlike traditional compost heaps, wormeries are specifically designed for small spaces, making them perfect for urban gardeners or anyone short on outdoor space.
These hardworking worms (typically tiger worms or red wigglers) effortlessly devour fruit scraps, veg peelings, coffee grounds, and even cardboard. The results? A rich, dark compost and “worm tea”—a liquid fertiliser that’s pure magic for your plants.
Why Worm Composting is a Game-Changer
1. A Sustainable Solution for Waste Management
The statistics are staggering—over 30% of household waste is organic material. Instead of sending it to landfill, where it creates harmful greenhouse gases, why not convert it into valuable compost? By starting a wormery, you’re directly reducing your carbon footprint and contributing to a greener planet.
2. Nourish Your Garden Soil
Worm compost, often called “black gold,” is packed with beneficial microbes, nutrients and minerals that supercharge your soil. It improves structure, boosts plant growth and even helps retain moisture—ideal for sustainable gardening practices.
3. Perfect for Small Spaces
Live in a flat or have a postage-stamp-sized garden? No problem! Wormeries are compact, neat and odourless, making them an excellent option for anyone with limited outdoor space.
4. An Educational Experience
Managing a wormery is not only practical but also a fascinating experience for adults and kids alike. It’s a brilliant way to learn about ecosystems, decomposition, and sustainable living.
How to Get Started with Worm Composting
Step 1: Choose Your Wormery
Wormeries come in various sizes and designs. Whether a single-tier bin or a multi-tray tower, pick one that suits your space and needs. Many models are designed for beginners and come with everything you need to get started, including a supply of worms.
Step 2: Set Up Your Wormery
Fill the base with damp bedding material like coir or shredded newspaper to create a cosy environment for your worms. Then, introduce your red wigglers or tiger worms to their new home.
Step 3: Feed Your Worms
Worms thrive on a diet of fruit and veg scraps, coffee grounds, tea bags (without plastic), and cardboard. Avoid feeding them dairy, meat, oily foods, or citrus fruits, which can upset the balance of your wormery.
Step 4: Maintain the Balance
Keep your wormery in a sheltered, shaded spot. Regularly check the moisture levels—your bedding should feel as damp as a wrung-out sponge. Too wet? Add shredded newspaper. Too dry? Sprinkle a little water.
Step 5: Harvest the Compost
After a few months, your worms will gift you rich, crumbly compost. Simply scoop it out, use it to improve your soil, or sprinkle it around your plants. Don’t forget to collect the worm tea and dilute it with water for an incredible liquid feed.
Tips & Tricks to Master Worm Composting
Start Slowly: Don’t overwhelm your worms with too much food at the start. Give them time to adjust and reproduce.
Add Variety: Mix different waste types for a balanced diet that keeps your worms happy and healthy.
Monitor Odours: If your wormery starts to smell, it’s time to check for food overload or poor ventilation.
Wormery Myths—Busted!
Think worm composting sounds messy, smelly, or complicated? Think again! Wormeries are designed to be clean and odour-free, provided they’re well-maintained. Plus, with their minimal space requirements, they’re perfect for any eco-conscious household.
Join the Worm Composting Movement!
Imagine walking through your garden, revelling in the knowledge that every thriving plant has been touched by the magic of your wormery. Worm composting isn’t just about recycling waste—it’s about creating a sustainable cycle of giving back to the earth.
Are you ready to revolutionise your composting routine and transform your gardening game? Start small, start now—your worms (and planet) will thank you.
Together, let’s dig into sustainable gardening with the wormery way! 🌱
Picture this—lush, vibrant soil teeming with life, ready to nourish your spring garden to dazzling heights. Sounds dreamy, right? But here’s the thing—how your soil performs in spring depends on how you treat it in winter. Even during those frosty months, your soil needs some tender, loving care.
Winter soil protection is essential for maintaining fertility, preventing erosion and setting the stage for a bountiful growing season. By making a few simple changes to your gardening routine, you’ll protect your soil and foster a healthier, happier garden. Here’s how to get started.
1. The Power of Covering Bare Soil
One of the most important steps in winter soil care is offering your soil a protective blanket. Why? Bare soil is at the mercy of harsh weather—think wind erosion, rain runoff and nutrient leaching. Without anything shielding it, essential nutrients can dwindle, leaving your soil depleted before spring even arrives.
How to Cover Your Soil
Mulch It Up: Spread organic mulch like straw, wood chips or shredded leaves over exposed soil. Not only does this protect against erosion, but it also locks in moisture and gradually adds nutrients as the mulch breaks down.
Plant Cover Crops: Known as “green manure,” cover crops like clover, rye or winter wheat prevent erosion while enriching your soil with organic matter and nitrogen.
Use Fabric or Tarps: For a temporary solution, breathable garden fabric or tarps can help protect bare patches from rain and wind.
Visualise it—a snug, cosy covering keeping your soil safe from the elements while nature works its magic beneath.
2. Avoid Disturbing the Soil – Protect Those Microbes!
Did you know your soil is alive? It’s a bustling microcosm filled with earthworms, microbes and fungi working tirelessly to build a healthy ecosystem. Winter is their downtime—a period to rest and support your soil in silence. To help them out, avoid unnecessary soil disturbance during colder months.
Why Less is More
Microbes Need Stability: Tilling or turning the soil disrupts the natural habitat of microbes, reducing their efficiency in maintaining soil health.
Worms are Key Workers: Earthworms burrow through the soil, improving its structure and nutrient cycles. Give them a chance to do their thing undisturbed.
Lower Compaction Risks: Walking or working on wet, cold soil can compact it, making it harder for roots and microbes to thrive later.
What You Can Do
Stay Off the Soil: Avoid walking directly on garden beds—use stepping stones or planks if you need access.
Skip the Digging: Instead of digging to “help,” add a fresh layer of organic matter on top and allow nature’s soil helpers to integrate it over time.
Think of it this way—your soil is hibernating and your job is simply to create the perfect environment for it to thrive come spring.
3. Think Long-Term – Healthy Soil is Sustainable Soil
Winter soil protection isn’t just about maintaining your garden but contributing to a healthy, sustainable ecosystem. Every action you take—be it laying down mulch or avoiding soil compaction—has long-term benefits. By focusing on building resilient, nutrient-rich soil, you’re making your gardening more sustainable and less reliant on artificial fixes.
Spring preparation should never start in March; it starts now. By protecting your soil during winter, you’ll enjoy richer, more productive harvests—and the satisfaction of knowing your garden is environmentally sound.
Your Winter Gardening Action Plan
Cover Exposed Areas with mulch, cover crops or fabric to shield your soil from the elements.
Avoid Unnecessary Disturbanceto preserve the delicate network of life below the surface.
Feed Your Soilby adding organic matter that will naturally integrate over winter.
Find the Joy in Sustainable Gardening
Imagine stepping into your garden next spring and seeing robust plants bursting with life. Your winter prep will set the foundation for this magical scene, ensuring your soil is fertile, thriving and ready for the next chapter of your gardening adventure.
Need ideas for green manure or guidance on choosing the right mulch? We’re here to help! Together, we nourish the earth—one garden bed at a time.
Winter is a time of beauty and rest, but for many of our garden visitors, it’s also a season of survival. If you’re a nature lover, gardener or simply someone who cherishes the sight of chirping birds and buzzing bees, there are plenty of ways to lend a helping hand. Helping wildlife this winter doesn’t just benefit the creatures; it brings balance, joy and life to your garden.
Why Support Winter Wildlife in Your Garden?
Supporting wildlife during winter isn’t just about kindness—it’s a win for your garden too!
Better Pollination: By supporting pollinators like bees, butterflies and other insects, you’ll enjoy improved pollination come spring, which means more flourishing flowers and thriving vegetables.
Natural Pest Control: Ladybirds, frogs, birds and hedgehogs naturally combat garden pests, saving you the hassle of chemical treatments.
Balanced Ecosystems: Wildlife keeps your garden’s ecosystem balanced, ensuring no one species dominates, whether it’s plants or pests.
Reduce Chemical Dependency: With beneficial creatures at work, you’ll rely less on pesticides and fertilisers, making your garden a safer, eco-friendly haven.
Enhanced Enjoyment: There’s nothing quite like relaxing in a garden alive with the sights and sounds of nature—it’s like a private concert from Mother Earth herself!
How to Support Wildlife This Winter
1. Provide Habitats
Imagine a hedgehog snuggled up in your garden for winter! Create homes for wildlife by adding hedgehog houses, insect hotels or leaving log piles in your garden. Birds will appreciate nesting boxes or dense shrubs for shelter. It’s all about making space for them to hunker down during the cold months.
2. Plant for Pollinators
Just because it’s winter doesn’t mean your garden has to be bare. Plant winter-blooming flowers like hellebores, snowdrops or winter heather to provide vital nectar for pollinators. Bees and butterflies are often searching for a little energy boost on mild winter days and your garden can be their saving grace.
3. Feed the Birds
Picture this—starling song in the morning as you sip your tea. Birds rely on gardens for food during harsh winters, so set up feeders with energy-packed seeds, suet balls and peanuts. Remember to keep feeders clean to prevent disease. And if you’re feeling extra generous, add water dishes that won’t freeze!
4. Companion Planting
Did you know some plants naturally protect others? Companion planting combines certain species to support pollinators while deterring pests. For example, plant marigolds to protect veggies or lavender to attract bees. Even over winter, planning your spring planting can make your garden a friendlier place for wildlife.
5. Leave Areas Untouched
Does the idea of “wild and free” appeal to you? Sometimes, the best thing you can do for wildlife is… nothing! Leave some areas of your garden untouched. Piles of leaves, overgrown corners, or quiet logs provide the perfect habitats for hedgehogs, insects and frogs.
6. Use Eco-Friendly Gardening Practices
Skip harsh chemicals this winter to protect the fragile creatures working below the surface, like earthworms and beetles. Opt for natural fertilisers or pest deterrents and make compost to enrich your soil sustainably.
A Garden Full of Life Awaits You
This winter, your garden has the power to be more than just a pretty scene dusted with frost—it can be a refuge for creatures great and small. From encouraging better pollination to enjoying delightful bird songs, the benefits are boundless, for both you and the wildlife.
Start small. Get planting, feed the birds, and leave a cosy spot for hedgehogs and bees. Together, we can create vibrant gardens that not only withstand winter but nurture it.
Are you ready to make a difference? Your garden is calling! 🌱
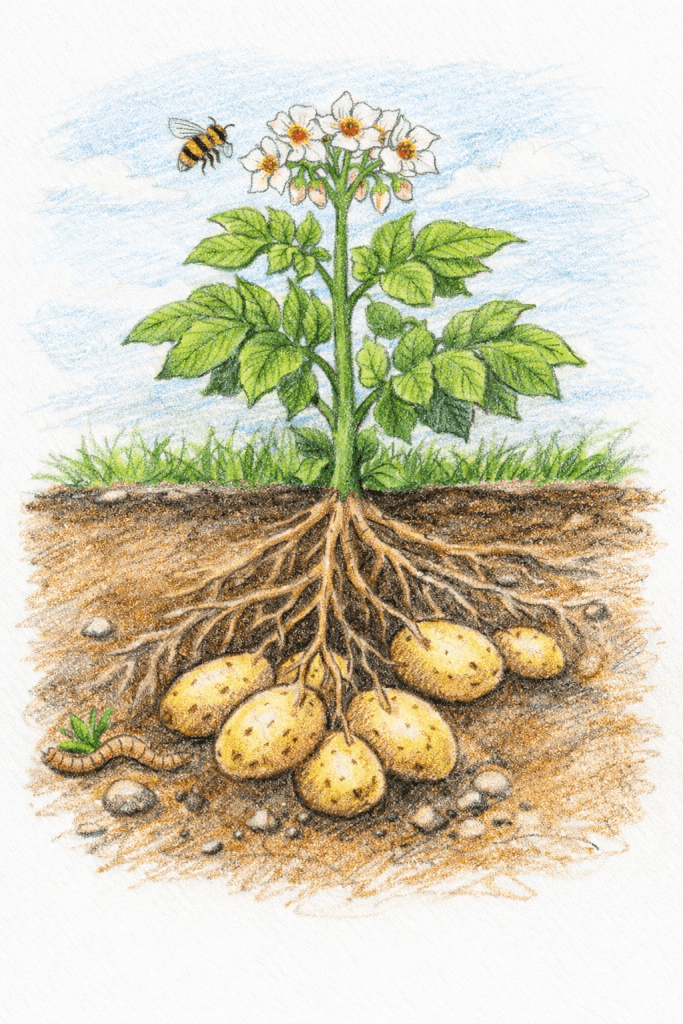
There are few pleasures in the garden quite like lifting the first potatoes of the season from the soil. Beneath the leaves and stems lies a hidden harvest – earthy, nourishing and wonderfully satisfying to grow yourself.
Potatoes are among the easiest and most reliable crops for home gardeners, thriving in vegetable beds, allotments and even large containers on a patio. With a little preparation and care, they reward you with generous yields and flavours far fresher than anything found on a supermarket shelf.
Whether you are new to gardening, keen to grow more of your own food, or simply curious about where your meals begin, growing potatoes offers a gentle and practical way to reconnect with the land.
This guide will walk you through everything you need to know about growing potatoes at home, from choosing the right varieties to planting, caring for your plants and enjoying a successful harvest.
Why Grow Your Own Potatoes?
Potatoes have been a staple of British kitchens for centuries, appearing in everything from comforting stews to crisp roast dinners. Yet growing your own offers rewards that go well beyond the plate.
Potato Plant: Solanum tuberosum
Fresh flavour straight from the soil
Freshly lifted potatoes have a delicate sweetness and texture that is difficult to replicate with shop-bought produce. When cooked soon after harvesting, their flavour is noticeably richer and more vibrant.
An abundant crop for little effort
Potatoes are famously generous plants. A small number of seed potatoes can produce a surprisingly large harvest, making them one of the most productive crops for home gardens.
A sustainable choice
Growing your own potatoes helps reduce food miles, plastic packaging and waste. It is a simple step towards a more sustainable kitchen and garden.
A perfect crop for beginners
Potatoes are forgiving plants that tolerate a range of growing conditions. Their reliable nature makes them an excellent choice for anyone learning the basics of gardening.
A wonderful way to engage children
Few gardening tasks delight children more than digging for hidden potatoes in the soil. It offers a hands-on way to learn where food comes from and to appreciate the rhythms of the seasons.
Choosing the Right Potatoes to Grow
When growing potatoes at home, it is important to begin with seed potatoes rather than ordinary supermarket potatoes.
Seed potatoes are specially grown for planting and are carefully inspected to ensure they are free from disease. They are widely available in garden centres and from specialist suppliers in late winter and early spring.
Potatoes are typically divided into three main groups depending on how quickly they mature.
First Early Potatoes
First early potatoes are the quickest to grow and are often planted in March.
They usually mature within around ten weeks, producing small, tender potatoes that are perfect for boiling or steaming.
These are often enjoyed as new potatoes, lifted fresh from the soil and served with butter and herbs.
Popular first early varieties include:
Rocket
Pentland Javelin
Swift
Second Early Potatoes
Second earlies take slightly longer to mature and are typically harvested between July and August.
They produce slightly larger tubers and are well suited to salads and light summer dishes.
Common second early varieties include:
Charlotte
Maris Peer
Kestrel
Maincrop Potatoes
Maincrop potatoes are planted later and take 16–20 weeks to mature, but they produce the largest harvest.
These varieties are ideal for roasting, baking and storing through the colder months.
Well-known maincrop varieties include:
King Edward
Maris Piper
Desiree
Planting a mix of early and maincrop potatoes allows you to enjoy a steady harvest from early summer into autumn.
Chitting Potatoes: Giving Them a Head Start
Before planting, many gardeners choose to chit their seed potatoes.
Chitting simply means allowing the potatoes to sprout before they go into the soil. This gives them a helpful head start and can lead to earlier harvests.
To chit potatoes:
Place them in a shallow tray or egg carton.
Position them with the small buds (known as “eyes”) facing upwards.
Keep them somewhere cool and bright, such as a windowsill or greenhouse.
After a few weeks, short green shoots will begin to develop. Once these shoots reach around 2–3 centimetres long, the potatoes are ready to plant.
Preparing the Soil for Potatoes
Potatoes grow best in fertile, well-drained soil that retains moisture without becoming waterlogged.
Before planting, take time to prepare the ground properly.
Improve the soil with organic matter
Dig in well-rotted compost or manure to enrich the soil. This provides essential nutrients and improves soil structure.
Ensure good drainage
Heavy soils can be improved by adding compost or planting in raised beds to prevent waterlogging.
Aim for slightly acidic soil
Potatoes prefer soil with a pH between 5.5 and 6.5, which also helps reduce the risk of certain diseases.
Taking a little care at this stage will help create the ideal environment for strong, healthy plants.
How to Plant Potatoes
Once the soil has warmed and the risk of hard frost has passed, it is time to plant.
Follow these simple steps for success.
Dig planting trenches
Create shallow trenches around 10–15 centimetres deep.
Space the potatoes
Place seed potatoes roughly 30 centimetres apart, with rows spaced about 60 centimetres apart.
Position the sprouts upwards
Always plant with the shoots facing upward so they can grow towards the surface.
Cover with soil
Gently cover the potatoes with soil and lightly firm the ground.
With warmth and moisture, shoots will begin to emerge within a few weeks.
Growing Potatoes in Containers
If you do not have a large garden, potatoes grow beautifully in containers, bags or raised beds.
Large pots, buckets or specialised potato grow bags all work well.
To grow potatoes in containers:
Fill the container with around 10 centimetres of compost.
Place a few seed potatoes on top.
Cover with more compost.
Continue adding compost as the shoots grow.
This method allows you to grow potatoes even on a balcony, patio or small garden space.
Caring for Potato Plants
Once established, potato plants require only modest care to thrive.
Earthing up
One of the most important tasks when growing potatoes is earthing up.
As shoots reach around 15 centimetres tall, mound soil around the base of the plant.
This serves several purposes:
Protects young plants from frost
Prevents potatoes from turning green in sunlight
Encourages the plant to produce more tubers
Repeat this process as the plant continues to grow.
Watering
Potatoes prefer consistent moisture, particularly when the plants begin to flower.
Water deeply during dry periods, but avoid waterlogged soil.
Feeding
An occasional application of organic fertiliser or liquid feed can help support healthy growth, especially in containers where nutrients are limited.
How to Encourage a Bigger Potato Harvest
A few simple practices can help maximise your crop.
Mulch the soil
Applying mulch around plants helps retain moisture and suppress weeds.
Rotate crops
Avoid growing potatoes in the same location each year. Crop rotation helps prevent soil-borne diseases.
Protect plants from frost
Young potato plants are vulnerable to frost, so covering them with soil or fleece during cold nights can protect the crop.
Maintain healthy soil
Good soil structure and organic matter support stronger plant growth and better yields.
Common Potato Pests and Problems
Like all crops, potatoes can occasionally face pests or diseases. Fortunately, many problems can be prevented through good gardening habits.
Slugs
Slugs may feed on developing tubers. Keeping beds tidy and encouraging natural predators can help manage them.
Aphids
These small insects feed on leaves and can weaken plants. A strong spray of water or natural predators often keeps them under control.
Potato blight
Blight is a fungal disease encouraged by warm, humid weather. Ensuring good air circulation and removing affected foliage quickly can help limit its spread.
Potato scab
This condition causes rough patches on potato skins. Maintaining slightly acidic soil reduces the risk.
Healthy soil and regular observation are often the best defence against most problems.
When and How to Harvest Potatoes
The most satisfying moment of potato growing arrives when it is time to lift the crop.
Harvesting first and second earlies
Early potatoes are ready when the plants begin to flower.
Carefully loosen the soil with a fork and gently lift the tubers from beneath the plant.
These potatoes are best enjoyed fresh rather than stored.
Harvesting maincrop potatoes
Maincrop varieties should remain in the ground until the foliage begins to yellow and die back.
Two weeks before harvesting, cut the stems down to allow the skins to toughen. This helps the potatoes store more successfully.
Lift the crop carefully and allow the potatoes to dry briefly before storage.
Storing Your Homegrown Potatoes
Proper storage ensures your harvest lasts well into the colder months.
For best results:
Store potatoes in a cool, dark and well-ventilated place
Keep them in paper sacks, wooden crates or hessian bags
Avoid exposure to light, which can cause greening
Under the right conditions, maincrop potatoes can keep for several months.
A Simple Step Towards Sustainable Living
Growing potatoes at home offers more than a plentiful harvest. It is a quiet reminder of how food begins – beneath the soil, shaped by seasons and patience.
Even a small garden can produce an impressive yield, and the process of planting, tending and harvesting brings a deeper appreciation for the meals we enjoy each day.
With their reliability, versatility and generous harvests, potatoes remain one of the most rewarding crops a gardener can grow.
Plant a few this spring, and by summer you may find yourself lifting your own basket of fresh, earthy potatoes from the ground – a simple pleasure that never loses its charm.
If you’re looking to grow something that’s both tasty and beneficial for your health, asparagus is a fantastic choice. Known for its unique flavour, versatility in recipes and impressive health benefits, asparagus is a perennial vegetable that keeps giving back year after year with a little care and attention. Here’s everything you need to know about growing asparagus in your garden.
The Health Benefits of Asparagus
Before we get into the nitty-gritty of growing asparagus, let’s take a look at why it’s worth adding to your plate:
Rich in Nutrients: Asparagus is packed with essential vitamins and minerals. It’s an excellent source of vitamins A, C, E and K, as well as folate.
Low in Calories: For anyone looking to eat healthily, asparagus is a low-calorie option and is full of fibre, making it great for digestion.
Antioxidant Properties: It contains antioxidants like glutathione, which can help combat free radicals and support overall health.
Good for Heart Health: Its high potassium content can help lower blood pressure and folate is key for cardiovascular function.
Supports Healthy Pregnancy: Thanks to folate, asparagus is particularly beneficial for pregnant women as it promotes healthy foetal development.
Why Grow Your Own Asparagus?
You may be wondering—why grow asparagus when you can buy it at the market? Growing your own comes with some distinct advantages:
Freshness is Key: The flavour of freshly harvested asparagus is vastly superior to anything store-bought.
Healthy Hobby: Gardening itself is a relaxing and rewarding activity for both mental and physical health.
Annual Harvests: Once established, asparagus plants can provide harvests for 15-20 years, making them a great long-term investment.
Low Maintenance: While it takes some patience to establish, asparagus is relatively easy to maintain over time.
How to Grow Asparagus
Now that you’re convinced, let’s jump into how to grow asparagus from scratch.
Step 1: Choose the Right Variety
There are two main types of asparagus to consider:
Green asparagus is the most common and thrives in many climates.
Purple asparagus has a sweeter flavour and is great for adding aesthetic appeal to your garden.
Make sure to purchase quality crowns (roots) from a reputable nursery, as these are more reliable than growing asparagus from seeds.
Step 2: Find the Perfect Spot
Asparagus thrives in full sun, so choose a spot in your garden that gets at least 6-8 hours of sunlight a day. The soil should be well-draining and rich in organic matter, with a slightly acidic to neutral pH (6.5-7).
Step 3: Prepare the Soil
Clear the chosen patch of any weeds or debris.
Enrich the soil with compost or well-rotted manure to create a nutrient-dense environment for your asparagus to flourish.
Step 4: Plant the Crowns
Dig trenches about 12 inches (30 cm) wide and 6-8 inches (15-20 cm) deep.
Place the crowns in the trench, spacing them roughly 12-18 inches (30-45 cm) apart. Spread the roots out like a fan and cover them with about 2-3 inches (5-7 cm) of soil.
Avoid covering the trench completely at first. Instead, gradually add soil as the plants grow taller.
Caring for Your Asparagus Plants
Once planted, asparagus requires consistent care to thrive and establish a strong foundation:
Watering
Keep the soil consistently moist but not waterlogged. Water regularly, especially during dry spells.
Mulching
Apply a layer of organic mulch (like straw or wood chips) to help retain moisture, suppress weeds, and regulate soil temperature.
Fertilising
Top-dress your asparagus patch with compost or a balanced fertiliser each spring to replenish nutrients.
Weeding
Remove any weeds by hand to avoid disturbing the shallow roots of asparagus plants.
How to Harvest and Enjoy Your Home-Grown Asparagus
Patience is key with asparagus. While it may take 2-3 years to get your first proper harvest, the wait is worth it.
When to Harvest
Year 1: Allow the plants to grow freely and establish strong root systems. Do not harvest.
Year 2: Harvest sparingly—just a few spears—to avoid over-taxing young plants.
Year 3 onwards: By now, your plants should be ready for full harvesting. Pick spears when they are 6-8 inches (15-20 cm) tall and before the tips start to open.
How to Harvest
Harvest spears by cutting or snapping them off just above the soil line. Harvesting usually lasts for 6-8 weeks in the spring before the plants need time to regenerate.
Cooking with Asparagus
As soon as you harvest your asparagus, it’s time to enjoy! From roasting and grilling to adding it to salads or soups, the possibilities are endless. Freshly picked asparagus is also delicious steamed with a drizzle of olive oil and a sprinkle of sea salt.
Final Thoughts
Growing asparagus is a rewarding venture for the patient gardener. With its rich flavour, impressive health benefits and low-maintenance nature once established, it’s a worthy addition to any home garden. Start with healthy crowns, tend to them with care and you’ll be enjoying fresh asparagus for years to come.
If you’ve been dreaming of lush, thriving gardens without the back-breaking labour of digging, then no-dig gardening might be just what you need. This sustainable gardening method has gained immense popularity amongst gardeners and those committed to eco-friendly living—and for good reason. It’s simpler, kinder to the environment and incredibly effective.
What is No-Dig Gardening?
The concept of no-dig gardening is exactly what it sounds like—gardening without the need to turn over or dig through soil. Instead of disrupting the natural soil structure, this method allows you to build fertile, healthy soil by adding organic layers on top. Think about it as mimicking nature—it’s how forest floors become fertile over time, naturally building rich layers of organic material.
Why Choose No-Dig Gardening?
No-dig gardening isn’t just easier; it comes with a plethora of benefits that make it an essential practice for anyone looking to garden sustainably.
1. Improves Soil Health
Digging disrupts the delicate ecosystem that exists beneath the soil. There’s a network of microorganisms, earthworms, fungi and bacteria that work together to keep the soil healthy and fertile. With no-dig gardening, these organisms remain undisturbed, naturally improving soil structure and fertility.
2. Reduces Weeds
One of the most significant perks of no-dig gardening is that it discourages weed growth. By covering the soil with mulch or compost, you block out sunlight, which prevents dormant weed seeds from germinating. This means less time battling weeds and more time enjoying your garden.
3. Cuts Down on Labour
Say goodbye to hours of back-breaking digging and turning over soil. No-dig gardens save you time and effort, making gardening accessible to everyone, regardless of physical ability or experience.
4. Promotes Sustainability
No-dig gardening is inherently eco-friendly. By reducing the need for heavy machinery and preserving soil ecosystems, it supports biodiversity and reduces your carbon footprint. Plus, it relies heavily on composting, offering a brilliant way to recycle organic waste.
How to Start Your No-Dig Garden
Starting a no-dig garden is straightforward, whether you’re an experienced gardener or a complete beginner. Here’s a step-by-step guide to help you kick off your no-dig gardening adventure.
Step 1: Choose Your Location
Pick a space in your garden that gets ample sunlight. No-dig gardening works on any soil type, whether it’s a patch of existing turf, poor soil or even an area covered in weeds.
Step 2: Lay Down a Weed Barrier
Start by suppressing any existing weeds. Lay down a thick layer of cardboard or sheets of uncoated newspaper directly on the ground. Overlap the edges to prevent light from reaching any weeds underneath.
Step 3: Add a Layer of Compost
On top of your cardboard barrier, spread a layer of nutrient-rich compost. Aim for about 4–6 inches (10–15 cm). This will serve as the first growing layer for your plants.
Step 4: Top It Off with Mulch
To keep moisture locked in and deter new weeds, add a layer of organic mulch like straw, wood chips or dried leaves over the compost.
Step 5: Plant Your Garden
Now comes the fun part! Plant seeds or seedlings directly into the compost layer. The roots will grow through the compost and eventually into the soil below, which improves as the organic materials decompose.
Step 6: Maintain the Layers
Over time, keep topping up your garden with fresh compost and mulch as layers break down. This replenishes nutrients and keeps your no-dig garden thriving season after season.
Tips for Successful No-Dig Gardening
Start Small: If you’re new to no-dig gardening, begin with a single raised bed to get the hang of it.
Use Quality Compost: Invest in nutrient-rich compost or make your own to ensure your plants get the nutrients they need.
Water Mindfully: No-dig gardens retain moisture well, so be careful not to overwater. Check the soil regularly to adjust as needed.
Rotate Crops: Keep pests and diseases at bay by rotating your crops each season.
Foster Biodiversity: Shelter bees, butterflies and other pollinators by planting a variety of flowers alongside your vegetables.
The Future of Gardening is Sustainable
No-dig gardening isn’t just a method; it’s a movement. By adopting this practice, you’re not only making your life easier but also contributing to a more sustainable world. It’s a win-win solution for passionate gardeners and the planet alike.
If you’ve always thought gardening was too much work or weren’t sure where to begin, now’s your chance to give no-dig gardening a go. Start small, be patient, and watch your garden flourish with minimal effort.
Join the No-Dig Movement
Have you tried no-dig gardening? Share your experience in the comments or tag us in your garden photos. Don’t stop here—spread the word about sustainable gardening practices and make a difference, one layer at a time!
Here’s to greener, healthier gardens—no digging required. 🌱
When it comes to sustainable gardening, green manures might just be your soil’s best friend. If you’re looking to improve soil health while reducing your reliance on synthetic fertilisers, green manures are an essential addition to your gardening toolkit. But what exactly are green manures, and why are they so effective? Let’s dig in!
What Are Green Manures?
Green manures are specific types of plants grown primarily to benefit the soil, rather than for food or ornamental purposes. They are deliberately sown to cover the soil and are eventually cut down and incorporated back into the ground. Common examples of green manures include clover, ryegrass, buckwheat and vetch.
The Benefits of Green Manures
Green manures offer numerous advantages, making them an excellent choice for both amateur gardeners and experienced sustainability advocates. Here’s why green manures are a smart choice for your garden:
1. Improves Soil Health
One of the main reasons to use green manures is that they rejuvenate tired or depleted soil. These plants capture nutrients from the soil and atmosphere, transforming them into organic matter when they decompose. This adds valuable nutrients back into your garden bed, creating a nutritious foundation for your next crop.
2. Reduces Soil Erosion
Left bare, soil can easily erode due to rain and wind. Green manures act as a protective cover, preventing valuable topsoil from being washed or blown away.
3. Suppresses Weeds
Green manures grow quickly, providing a dense cover that prevents sunlight from reaching unwanted weeds. This natural weed suppression means less weeding for you and healthier soil long-term.
4. Promotes Sustainable Gardening
If you’re serious about sustainable gardening, green manures are a game-changer. They improve soil structure and fertility without synthetic fertilisers or chemical inputs, helping you grow more eco-friendly produce.
5. Boosts Soil Microbial Life
When green manures decompose, they feed the soil’s microbial life, promoting a thriving ecosystem beneath the surface. Healthy soil microbes are crucial for plant growth and maintaining high levels of soil fertility.
Common Types of Green Manures and Their Uses
Different green manures bring different benefits to your garden. Here are some popular choices:
Clover
Great for nitrogen fixation, clover is ideal for enriching the soil with this vital nutrient. Perfect for vegetable patches or areas that will soon host nitrogen-hungry plants.
Ryegrass
Known for its fast growth, ryegrass is ideal for covering soil quickly. It improves soil structure and enhances organic matter when turned back into the soil.
Buckwheat
A fantastic choice for suppressing weeds and improving soil by adding phosphorus. It’s a favourite among those looking to improve soil in a short period.
Vetch
This is another excellent nitrogen fixer, making it a popular green manure for sustainable gardening enthusiasts.
How to Use Green Manures in Your Garden
Step 1. Choose the Right Green Manure
Select a green manure suited to your soil type and gardening goals. For example, clover is ideal for nitrogen fixation, while buckwheat is great for rapid growth during warmer months.
Step 2. Sow the Seeds
Prepare your soil by removing any existing weeds or plants. Sow your green manure seeds according to the packet instructions, ensuring even coverage for maximum effectiveness.
Step 3. Grow and Maintain
Allow your green manure to grow, keeping an eye out for any weeds that may sneak through. Most green manures need minimal care beyond occasional watering.
Step 4. Cut and Incorporate
Before your green manure begins to flower, cut it down and dig the plant material into the soil. Timing is key—doing this before flowering ensures the plants decompose efficiently.
Step 5. Wait and Plant
Wait a couple of weeks before planting your next crop. This allows the green manure to break down fully and release nutrients into the soil.
Pro Tips for Success with Green Manures
Rotation is Key
Use green manures as part of a crop rotation strategy to avoid overusing the soil or introducing pests and diseases.
Seasonal Selection
Choose green manures that thrive in the current season. Ryegrass and clover are excellent for winter, while buckwheat prospers in summer.
Cover All Bare Soil
Whenever you’re not actively growing crops, consider covering the soil with green manure. This maximises soil health and minimises maintenance over time.
Green Manures and the Future of Sustainable Gardening
By incorporating green manures into your gardening practices, you’re not only improving your garden but also making a significant contribution to sustainable living. These plants work hand-in-hand with nature to build healthier soil, stronger plants and a more eco-friendly world.
The Yellow Rattle plant (Rhinanthus minor) is a fascinating wildflower that has grown increasingly popular among gardeners and nature enthusiasts. Why? Because it’s not just a stunning addition to a garden—it’s also a powerful tool for creating vibrant, wildlife-friendly meadows and lawns.
If you’re looking to bring more life and biodiversity to your gardening space, this unassuming wildflower could be your new best friend!
What Is the Yellow Rattle Plant?
The Yellow Rattle plant is a semi-parasitic wildflower that thrives in grasslands and meadows. It gets its name from the rattling sound its seeds make in their pods when they’re mature—like a gentle call for nature to scatter the seeds.
This plant has small, yellow, hooded flowers that sit alongside delicate green leaves. Typically blooming between May and September, Yellow Rattle helps transform a basic patch of grass into a thriving wildflower meadow.
But what makes it semi-parasitic? Unlike most plants that produce their energy solely from photosynthesis, Yellow Rattle partially relies on neighbouring grass roots for nutrients. This unique characteristic allows it to suppress grass growth, making way for other wildflowers to grow and flourish.
Why Is the Yellow Rattle Plant Important?
1. Your Secret Weapon for Wildflower Meadows
If you’ve always wanted to create a wildflower meadow but didn’t know where to start, the Yellow Rattle plant might be exactly what you need. Left unchecked, grasses can out-compete wildflowers for resources such as sunlight and water, stifling their growth.
Yellow Rattle reduces the dominance of grass, weakening its root system and slowing its spread. By keeping grass in check, it creates pockets of light and space for native wildflowers to thrive, encouraging a diverse, colourful meadow full of life.
2. Transforming Lawns with Ease
Does your lawn feel like a never-ending maintenance battle? Bringing Yellow Rattle into the mix can transform your space into an eco-friendly haven. By reducing grass density, you’ll find yourself mowing less often while supporting a more natural aesthetic.
Plus, a meadow-style lawn filled with wildflowers uses fewer resources—no chemicals, no fertilisers, and less watering—making it better for the environment and your wallet!
3. Promoting Wildlife and Biodiversity
Yellow Rattle doesn’t just help other plants thrive; it also supports local wildlife. Wildflower meadows enriched by Yellow Rattle attract a variety of pollinators, including bees, butterflies and hoverflies.
More flowers mean more nectar, and in turn, a healthy population of insects. This, in turn, supports birds, hedgehogs and other animals, creating a mini-ecosystem in your garden.
Essentially, introducing Yellow Rattle plants to your garden is an easy way to play a vital role in maintaining the natural balance of the local ecosystem.
Tips for Growing Yellow Rattle in Your Garden
For gardeners ready to take the plunge, here are a few helpful tips to grow and care for Yellow Rattle successfully.
Sowing the Seeds: Yellow Rattle thrives when sown in autumn, between August and November. The seeds need to experience cold and frost to germinate—a process known as vernalisation. Scatter the seeds over bare soil with minimal grass coverage for the best results.
Reduce Grass Coverage First: Since the seeds have a hard time growing through dense grass, cutting or thinning your grass before sowing increases the likelihood of healthy germination.
Don’t Overwater: Yellow Rattle does well in well-drained soil. Once established, it doesn’t require much watering—ideal for gardeners who prefer low-maintenance planting.
Patience Pays Off: Wildflower meadows take time to establish, so don’t rush the process. With the right conditions, you’ll see results within one to two growing seasons.
A Final Note on the Yellow Rattle Plant
Whether you’re keen on creating a stunning wildflower meadow, transforming your lawn into a natural haven, or simply boosting biodiversity, the Yellow Rattle plant is an excellent choice.
Not only does it offer practical benefits, but it also serves as a vital link in supporting wildlife in gardens large and small. Plus, it’s relatively easy to manage, meaning you won’t need green thumbs to achieve your gardening goals.
Why not give Yellow Rattle a try? Nature and your garden will thank you for it.
Happy gardening! End of document
Additional Resources
Want to learn more about Yellow Rattle and other native wildflowers? Here are a few resources to get you started:
The Wildlife Trusts offers in-depth information on Yellow Rattle’s characteristics, habitat, and distribution across the UK.
Royal Horticultural Society provides useful growing advice for Yellow Rattle, including its hardiness and preferred soil types.
The Plantlife website has a wealth of resources on wildflowers, including Yellow Rattle’s role in creating and maintaining meadows.
BBC Gardeners’ World offers practical tips for growing Yellow Rattle from seed to bloom.